Dark souls 3 how to pass the boss. Fingers of the Rosary Covenant and Redistribution of Attribute Points
The Dark Souls line of games has always been distinguished by its hardcore and boss fights. In the guide, we will tell you about all the bosses in Dark Souls 3 in order, tell you about the passage and how to kill them. And so let's get started.
Dark Souls 3 walkthrough of all bosses in order.
Judge Gundyr
Location: Cemetery of Ash
Reward: Coiled Sword, 3000 souls
Judge Gundir
How to get through the first boss? We approach it and take out the sword from it. We immediately begin to beat him, there is an opportunity to start inflicting damage even before he gets up and starts attacking you. This boss has a long attack range and can easily hit you from a great distance. In the event that you decide to kite him, then you should move away, and if you fight close, then do not be afraid to come closer. It is necessary to dodge lunges and circular attacks, then immediately attack. After the boss has half of his health, he will begin to transform and become much larger, the distance of his attacks will also increase. We stick to the same strategy and attack him after his attacks. When he lowers his right hand to the ground, we move away so that he does not grab us. You can also hit when the boss leans forward slightly to hit.

Vordt of The Boreal Valley
Location:
Reward: Soul of Cold Valley Vordt, 3000 Souls
Cold Valley Wardt
In order to make it easier to fight this boss, you need to acquire things that increase resistance to cold. When fighting this enemy, you need to try to stay behind and attack him in the back, because he attacks exclusively from the front and over a large area, and being behind the back, it will be very easy to survive. After the boss's health drops to half, white steam will begin to appear around him. In the event that the boss starts shooting ice balls from the mouth, we move as far as possible. We do not change tactics, we repeat everything described above.

Curse-Rotted Greatwood
Location: Undead Settlement
Reward: Soul of the Cursed Great Tree, Transposition Furnace, 7000 Souls
Cursed Great Tree
First, when you get to the location, you need to kill all simple opponents, then go to the boss. After the boss comes to life, you need to start hitting the growths, they will be immediately visible. After that, you will fall into the ground. Next, we go behind the boss and attack the growths again. When he rises, we move away. We run away from the yellow puddles, they do not much damage, but they slow down a lot. We destroy the growths on the side, trying not to get hit by the hand. It remains to deal with the growths on the legs.

Crystal Sage Expert
Location: Road of Sacrifices
Reward: Crystal Adept Soul, 8000 Souls
Crystal Spell Expert
This boss is dangerous because he knows how to shoot large crystal balls, despite the fact that they are slow enough and easy to dodge, they do a lot of damage. First we attack the boss, after which he will disappear and crystals will appear. Then the boss will sometimes start to disappear and appear in different places, at this moment we will need to dodge the shots, and then counterattack. Further, the boss will have five orbs over his head. As before, they fly very slowly, so we attack and dodge. At the last stage, the boss summons its copies, each and which will also attack you. You need to find the real boss and dodge attacks, kill him.

Deacons of the Deep
Deacons of the Deep
There are a lot of enemies in this location, you should not attack everyone, you need to find the one who is highlighted in red and focus on him. Moreover, they are all slow enough and will not cause you much harm. Ignore them and dodge. When the second stage comes, opponents will appear who will shoot fireballs at you, so it's better to kill them. And do not forget to attack the main one. The "Pontiff's Left Eye" ring, which restores HP upon successful attacks, can facilitate the battle. If you can't get through with your current equipment, then it may be worth putting on heavy armor and taking any two-handed sword that will simply scatter the ghouls.

Abyss Watchers
Guardians of the Abyss
At the very beginning, the boss will rush forward and start the fight with a lunge. Most often, he alternates between blows with a sword and a dagger. At the very end, he hits in a circle. After a series of blows, the moment comes when we need to start hitting him. When the boss enters the second phase, he will summon mobs, which should be noted are very nimble, but there is no need to be distracted by them. The most interesting thing comes at the end when the boss dies. After the first time, he will be reborn, and will become even stronger. We attack in the same way after his series of techniques, ending with a circular blow or a strong blow to the ground. If you move far away, the boss will make a powerful dash, which is difficult to dodge.

High Lord Wolnir
High Overlord Volnir
Once at this location, you need to go to the light, the boss will be waiting for us there. He will come out of the darkness to us, or rather the head and his hands. If you are using a shield, you can immediately remove it. In the battle with this boss, you will not need it, it is better to take a weapon with decent damage. At the moment when the boss raises his hand up, you need to come closer to him, or move as far as possible to dodge the blow. As soon as he makes a blow, you need to counterattack him and hit the gold bracelets on his hands. When the boss blows out black smoke from his mouth, we run as far as possible. If skeletons appear, do not pay attention to them and finish off the boss.

Pontiff Sulyvahn
Pontiff Salivan
Location: Irithyll of The Boreal Valley
Reward: Soul of Pope Salivan, 28,000 souls
Quite a strong and fast boss. We go into the room, and he immediately rushes to us. Knows how to make jerks to the side. Deals several blows with a fiery sword in a row, after which you can respond. With the second sword he lunges in the direction of the hero. It is most convenient to rotate around the boss constantly trying to go behind him and periodically inflict one blow at a time. When the second stage of the fight begins, the boss will kneel down and throw you back with magic. When the shadow he summoned (or something similar) begins to appear, it will be time for several hits on the boss. The shadow will get in the way, but you don't need to focus on it. The boss will start striking after jumping, so when he jumps, we move away from the attack.

Old Demon King
Old demon king
The boss is optional. For battle, you need armor with resistance to fire and physical damage. If you go in and immediately start hitting the boss, then you can manage to do a lot of damage. The boss will attack with his weapons and fire waves from the front. We dodge fiery attacks and try to attack and stay behind. After the boss raises his hands up from the sky, fireballs begin to fall - we dodge. He can also make powerful circles of fire, and we run away from them.

Yhorm the Giant
Giant Yorm
Location: Irithyll Dungeon
Nearest bonfire: Defiled Capital
Reward: Ashes of the Lord, Soul of the Giant Jorm, 36,000 souls
First of all, we run past the boss to his throne and take the Storm Ruler sword. We take it with both hands and use (L2 (PS4) / LT (XB1)) special attacks. The boss is not agile and it is easy for him to go behind his back, passing between his legs. We return near him and charge the attack. We wait for a good moment and hit. You can often manage to perform two attacks in a row. In the second half of the battle, the boss will burn with fire and will be able to beat him. We do not fall under circular attacks.

Aldritch, Devourer of Gods
Location: Irythill of the Boreal Valley
Nearest bonfire: Anor londo
Reward: Ashes of the Overlord, Soul of Aldrick, 50,000 Souls
Basically, the boss uses magic attacks and close attack with physical damage. He shoots arrows, which must be dodged. It is better not to go far away from him. We try to hit the long body and move away when he sticks his staff into the ground. We attack after fired arrows and melee attack. When he shoots from a bow, we run, but make sure that he does not hit us with his staff.

Dancer of the Boreal Valley
Cold Valley Dancer
Location: High Wall of Lothric
Nearest bonfire: Cold Valley Wardt
Reward: Soul of the Dancer, 60,000 souls
The peculiarity of this boss is that he wields a very long sword and moves in a circle. It is best to attack the Dancer from behind, while dodging her circular attacks and blows from above. As the boss progresses into the second phase, he will have a second sword. Because of this, she begins to inflict more circular attacks. After a series of blows, we attack. We try not to stand in front of the boss - the blows from above are very strong.

Oceiros, the Consumed King
Oceiros, the Consumed King
Location: Consumed King's Garden
Nearest bonfire: Cold Valley Dancer
Reward: Soul of the Consumed Oceiros, 58,000 souls, path to the "Abandoned Graves" location, "Way of the Dragon" gesture
This is a fairly slow and not the most difficult boss in Dark Souls 3. He is quite slow and attacks with sweeping staff strikes at close range. At the moment when he sticks his staff into the ground, we need to have time to move away, then smoke will appear around the boss. Sometimes the boss can jump on us, and you need to dodge in time. It is best to stay close to the boss's feet, so it is easier to dodge. It is often possible to strike before the smoke appears. In the second stage Consumed King he will start spinning himself, he also begins to move quickly and freeze everything while in flight. We try to keep under his belly and beat him after his attacks. It's better not to hide behind the columns - the boss will break them.

Dragonslayer Armor
Dragonslayer Armor
Location: Lothric castle
Nearest bonfire: Dragon barracks
Reward: Soul of Dragonslayer Armor, 64,000 souls, path to Prince Lothric.
The Dragon Slayer Armor is one of the fast bosses in Dark Souls 3 (the only one with a shield), he knows how to dash towards the hero, fights close and delivers very strong blows from above. After he delivered a series of blows, we begin a counterattack. You need to try to constantly run around the boss in order to avoid his hits. After simple attacks of the boss, we do not inflict more than one hit. We dodge the swings in advance. In the second stage, balls will fall from the sky, we move away from the impact.

Champion Gundyr
Location: Cemetery of ash
Nearest bonfire: Untended graves
Reward: Soul of Champion Gundyr, 60,000 souls
At the very beginning, we attack the boss even before he gets up. We try to hold on to our backs or to the side, dodging his blows. The moment the boss kneels down, we start attacking him. In the second phase, the boss becomes much faster, and on top of that, he will start punching and kicking. We continue to attack in the back. It is better not to stand on the way of the boss and constantly go to the side from the attacks. We try not to stand still so as not to get caught in jumps.

Ancient Wyvern
This boss is quite unusual, and you can defeat this dragon with one hit if you want. We run past the boss through the tunnels, go up higher and next to the door (at the entrance to the boss) we go up the stairs. We pass along the wooden platform and jump down several times. We fall on the ledge, which is located above the head of the dragon. Here you need to jump down and kill him.

Lothric and Lorian (Lord of Cinder: Lothric Younger Prince & Lorian Elder Prince)
Location: Lothric castle
Nearest bonfire: Dragonslayer armor
Reward: Cinders of a Lord, Soul of the Twin Princes, 85,000 souls
This boss is dangerous due to his teleportation skill. Using teleportation, he can appear behind your back. He is very dangerous because he can strike at a great distance and even dash towards the hero. We dodge his attacks, and hit during the break. You can try to stab in the back. After the boss dies, the girl will resurrect him and unite with him. We dodge shots that can easily kill. We hit after the boss hits and carefully monitor the teleportation. If you killed the boss again, but did not kill the girl, then most likely she will revive him again. She must be killed. Having defeated her, you can not finish off the boss, he will die himself.

The Nameless King
Location: Archdragon peak
Nearest bonfire: Great belfry
Reward: Soul of the Nameless King, 80,000 souls, Titanite Slab, Dragonslayer Set (Helm, Armor, Gauntlets, Leggings), Nameless King Set (Golden Crown, Dragonscale Armor, Golden Bracelets, Dragonscale Waistcloth).
We activate the switch and, after the bell rings, we get to the boss. It is extremely important to dodge the dragon's blows in time and counterattack him on the head. In turn, the King will try to hit you with his weapon from the front. Try to stay as close to the dragon's neck as possible without getting hit by its wings. If the dragon takes off, then we do not stand still, we move away from air attacks. After the dragon dies, a battle begins with its rider. The rider can also attack from a distance or make sharp dashes towards the hero. After waiting for the moment, after he struck a series of circular blows and counterattack him. It is best to strike one or two hits and retreat. Try to hide behind a shield. Lightning attacks will appear in the second half.

Dark Souls 3 final (last) boss. How to get through Gwyn the Lord of Ash.
Soul of Cinder
Location: Kiln of the First Flame
Nearest bonfire: Kiln of the First Flame
Reward: Soul of the Lords, 100,000 souls, opportunity to start NG +
This is the long awaited final boss of Dark Souls 3. He is very dangerous and fast. Close up hits with circular and sweeping blows, lunges. When the boss has finished a series of his punches, we begin to beat him back, no more than 2-3 punches at a time, otherwise we will not have time to dodge. When the boss enters the second phase, he has knockback blows. The difficulty of the game increases due to the fact that the range of his attacks will increase. Further more. He has magic balls from which you will have to constantly hide and dodge. Here you will need to attack more carefully, after his magical attacks. After the first victory (we move away from the explosion) the boss will become even angrier, and the attacks will become even faster and further. Fiery swings with a sword are very dangerous. We move away when he plunges the sword into the ground. We attack after such a series. We hit the same several times. Moving away from lightning strikes.
♦ : What and where do you need to find to get into the final expansion for Dark Souls 3 called "The Ringed City"?
"The Ringed City" is the last, final expansion of the two planned for Dark Souls 3. As usual, you won't be able to play the DLC or, in other words, activate the expansion in the main menu, because the "entrance" is located in a certain location. This suggests that before starting the passage of the final expansion, you must first master a certain part of the main game.
How to get to a new location?
This time, you won't have to look for new NPCs to access the add-on. To activate the add-on and in order to be transported to a new location - just touch one of the two bonfires.
Firstly, if you do not have a previous add-on called "Ashes of Ariandel" or it remains uncompleted, then the entry point to the new location will be located in the area called "Kiln of the First Flame", near the main bonfire in this location.

Secondly, if the "Ashes of Ariandel" expansion was completed, then another bonfire will appear near the fire that remained after Sister Friede - it is he who takes your character into the new final expansion.
♦: Note also that the specifics of the "entry" points in addition are located for a reason. The fact is that the new addition will really test you for strength, so I highly discourage untrained undead hunters from embarking on a new journey. The bottom line is that the new addition is intended for heroes and heroines of level 100 or higher.
Location: "Garbage Pile" (All Secrets)
♦ : Complete walkthrough of the "Garbage Pile" location in the latest addition "The Ringed City" for the original game Dark Souls 3. The location of all secrets, collectibles, all enemies in the location, helpful tips and tactics for passing.
Dreg Heap is an isolated location from the rest of the world of Dark Souls 3 that appeared in the game with the release of the latest planned expansion, The Ringed City. If you do not know how to get to this place, then I recommend that you read the article a little higher.
This guide will help you find all the useful items in Dark Souls 3: The Ringed City, will help you defeat all the most difficult and dangerous enemies. In the end, it will help you not to get lost among the tangled paths of the location.
... Path: "Ashes and the Assassin Angel"
As soon as you find yourself in a brand new location, the first thing, as usual, light a fire and leave the building. Once you complete these simple steps, go further along the edge of the gabled roof on the right side of the character and eventually you can find "Ember". But that's not all: at the very edge of the cliff, there will be a merchant named "Karga with a stone coffin" nearby. This old lady will sell a couple of blessings and a Splitleaf Crearsword. In the end, she will also be able to sell all the trash you have accumulated, which I strongly recommend to do.
So, having talked a lot with this Karga, go down a kind of staircase (which consists of ledges) down. Moreover, pay attention to the fact that when you land on ash-covered soil, your character will not receive damage. This is a very important point, because this fact will come in handy more than once in the course of the game.

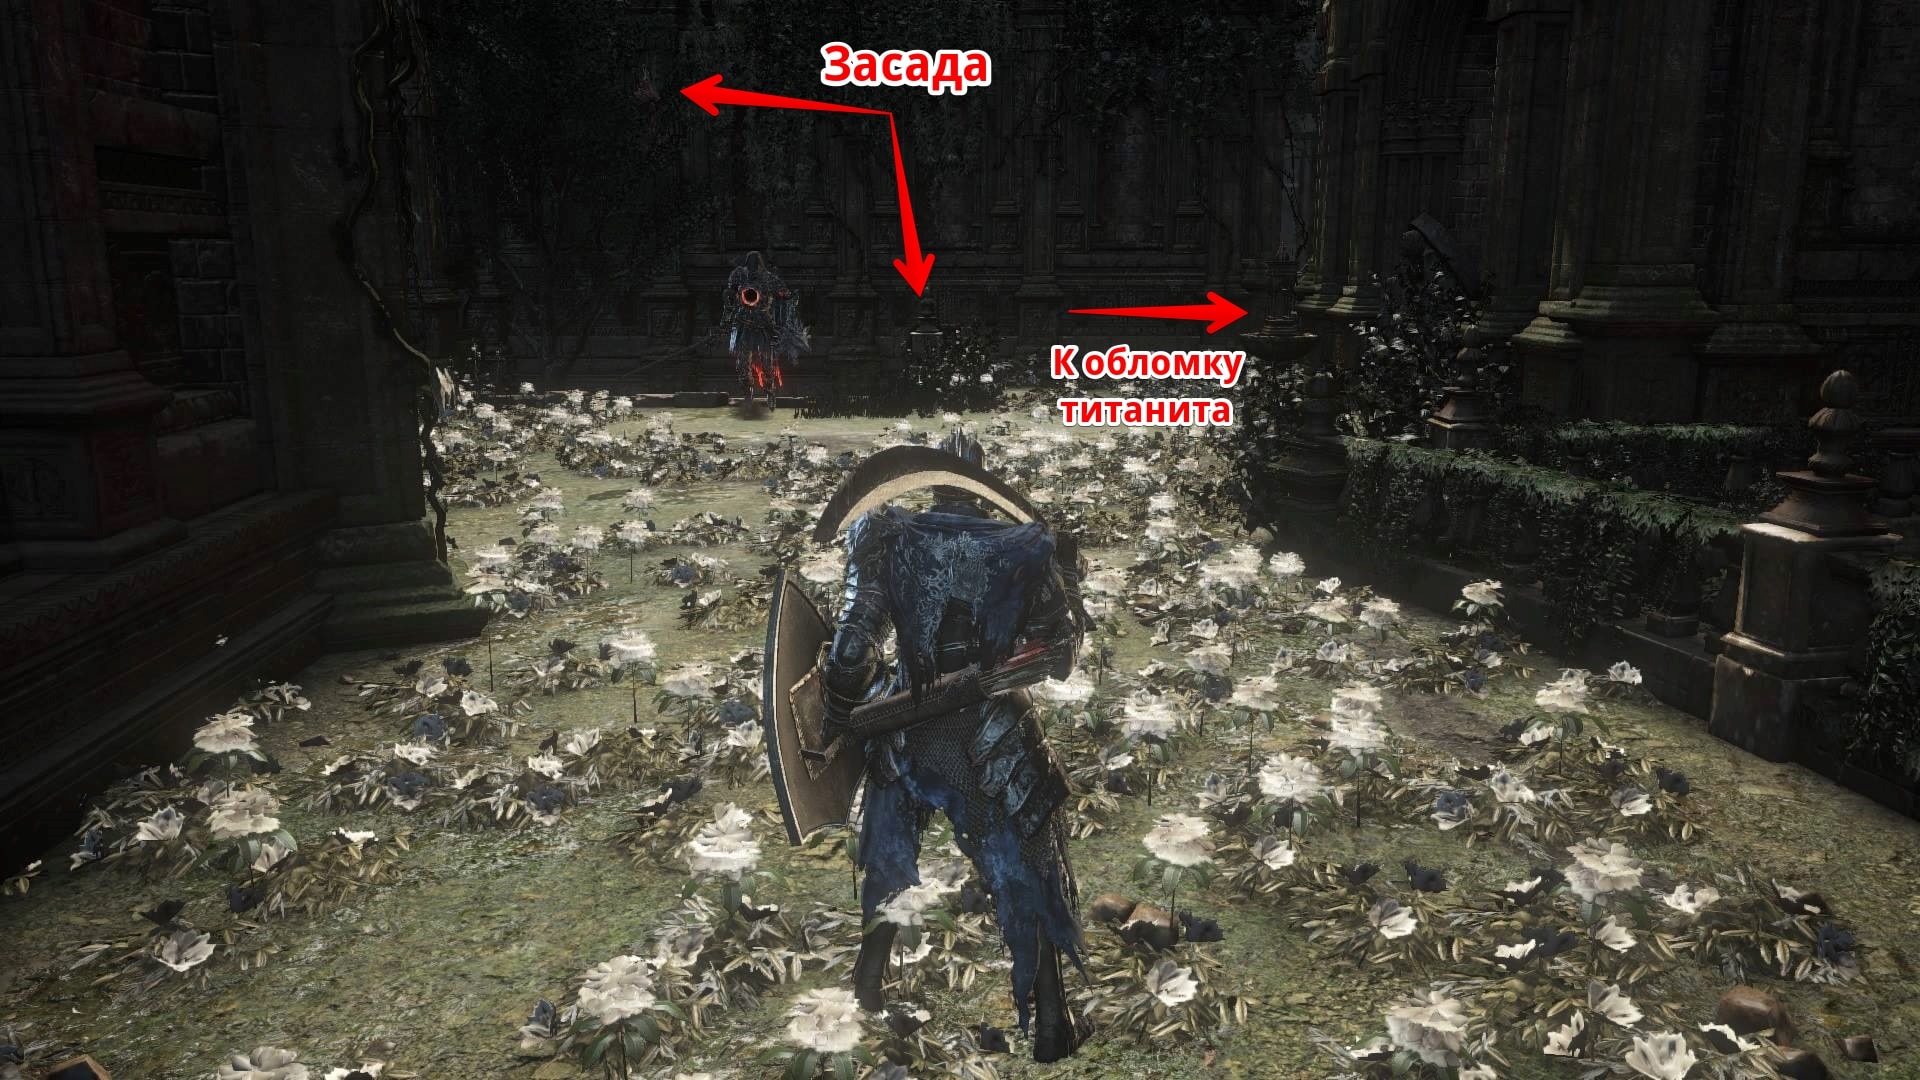
A little further you will find a fork and the first meeting with new enemies - the "Dwellers of the Deep" (Murkman). These enemies are more reminiscent of Irithyll slaves. In addition, this type of enemies is divided into two types: the first type is those that crawl and at the same time skillfully wield sickles; the second type is upright enemies with staffs in their hands. Moreover, the first type of inhabitants of the Depths can easily crush your character with their number, or simply grab him, unless, of course, get rid of them in time. The latter stand out from the rest in that they use long-range magic. In addition, both options have a predisposition to transformations, so they can take on a shape that resembles a living projectile. However, it is quite easy to dodge this projectile because its speed is too low. And yet, first of all, it is the sorcerers who should always be killed, because only they can summon these very crawling inhabitants of the Depths, and they can do this absolutely endlessly.
Before moving on (that is, along the road that leads to the right), I strongly recommend that you look into that part of the castle, which is on the left hand of the hero. So, to meet the hero / heroine, a quite impressive-looking enemy called "Harald Legion Soldier" will jump down. He is also intimidating for the reason that instead of his usual face he has a gaping black hole. How to defeat Legionnaire Harald? First of all, try to keep a respectful distance from him so as not to get hit by the powerful blows of his sword. Those short respites that he makes after each blow, your chance to inflict a couple of blows on him (and the attack of a legionnaire in a jump is extremely convenient in this regard). Otherwise, nothing complicated, so you can safely follow these tactics. Therefore, when you deal with the legionnaire, pick up a Titanite Chuck and an item called Aquamarine Dagger nearby on the landing (a little higher up the stairs). Moving on.

Well, it's time to go back to the fork and finally go to the right side. Moreover, in this place, pay attention to a narrow and not too reliable ledge - an object glows in this place. If you try to take this item, the ground will immediately collapse under the feet of the hero / heroine. As a result, the character will fall through the roof of the chapel, but the main charm is that he, again, will not receive damage. Therefore, having quickly recovered after a soft fall, take on the cleaning of the place from enemies (the inhabitants of the Depths will live and wait for you here). And after the battle it will be possible to collect all the useful objects scattered around. What exactly is there?

The most delicious first thing is the Soul of a Weary Warrior. A soul is picked up from a corpse that fell down with the character. The second important thing is the Titanite Scale. There are scales behind the fall site. Next, pick up the Twinkling Titanite. This shard is stuck in the candelabrum on the farthest side of the room, so try not to miss it. The last item will be a weapon called "Murky Hand Scythe", which is located behind the bookcase on the left hand (however, before you take this weapon, deal first with the next inhabitant of the depths lurking on the ceiling).
Immediately after you collect all the items, go outside through the hole, which in turn is in the wall. Soon ahead you will be able to see one of the many messages that were left by the developers. In this case, it will be: "Do not be afraid - feel free to jump down." So, the bottom line is that attempts to defeat a monster flying nearby, which in some details resembles an angel, will lead nowhere. Why? Because this monster will bombard the character with its magic arrows non-stop. How do you defeat him? To defeat this monster, you first have to find and kill a unique creature, but more on that later.
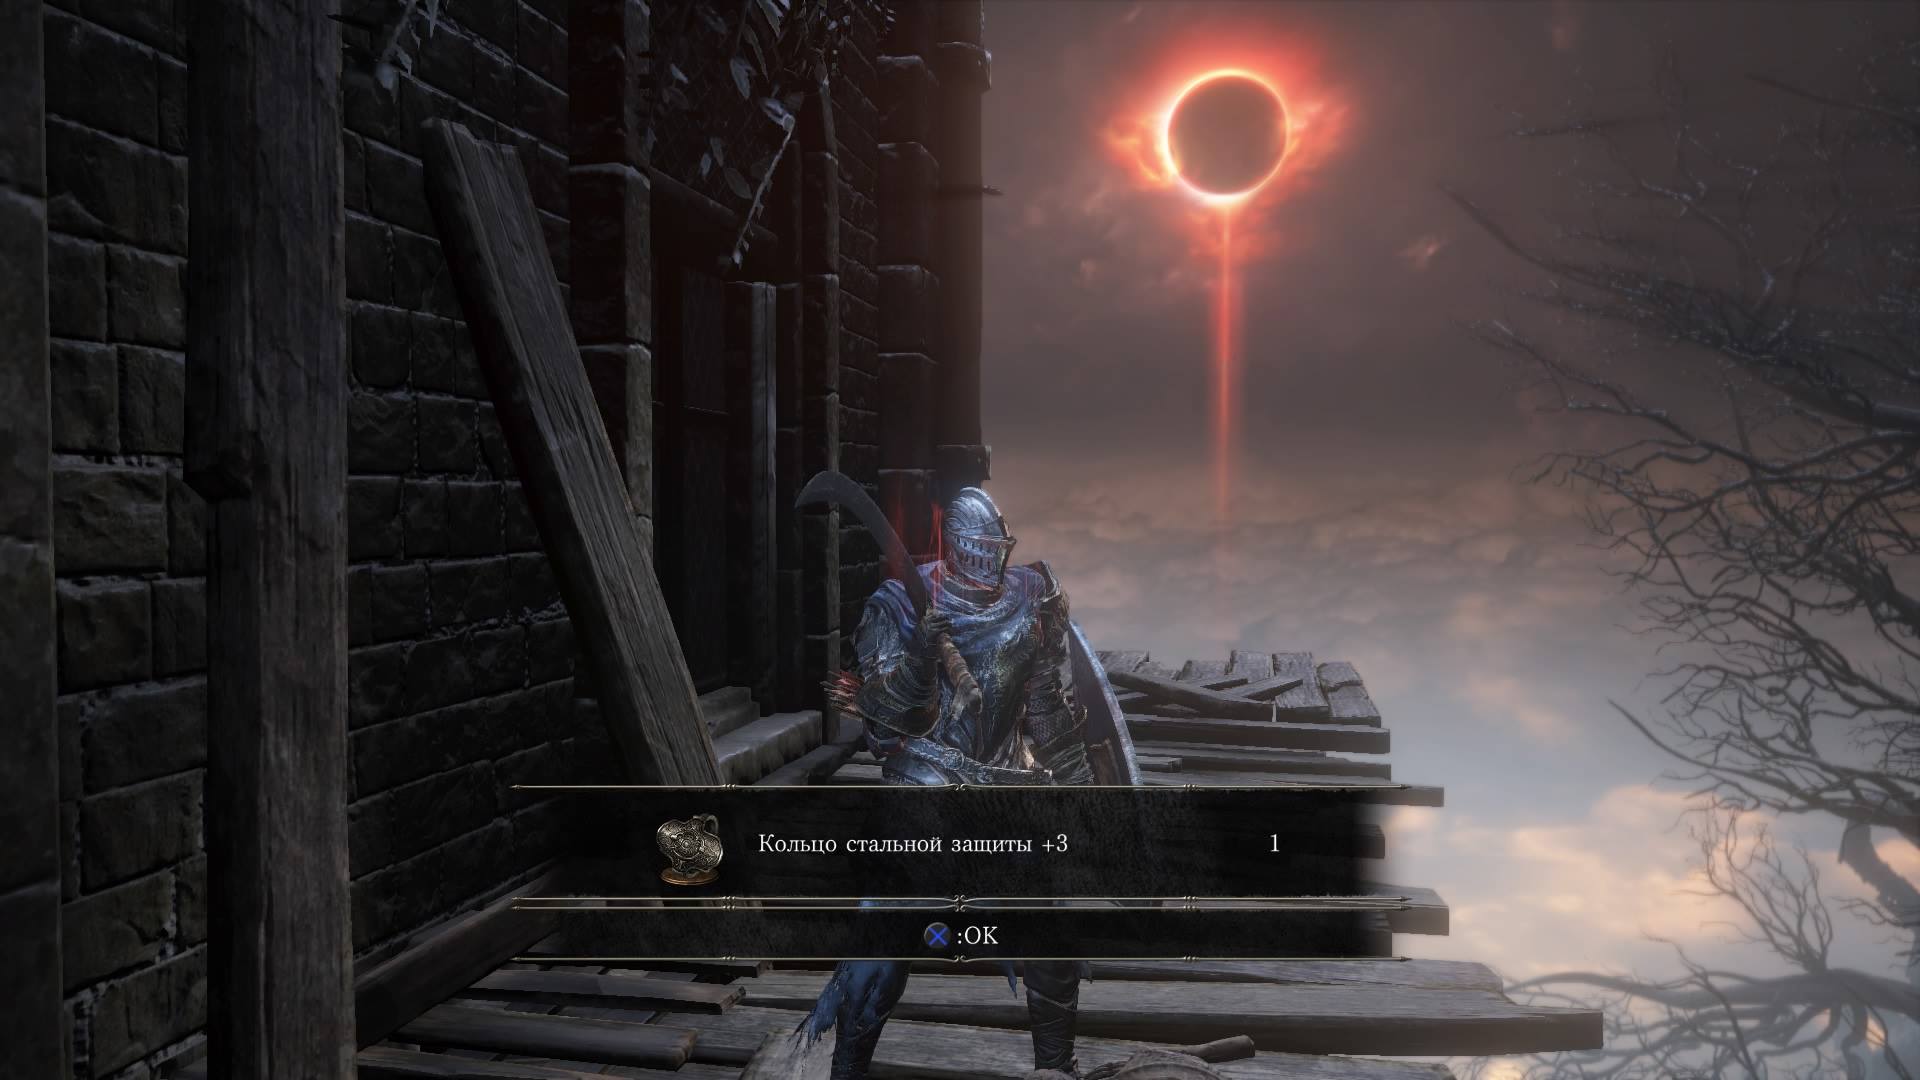
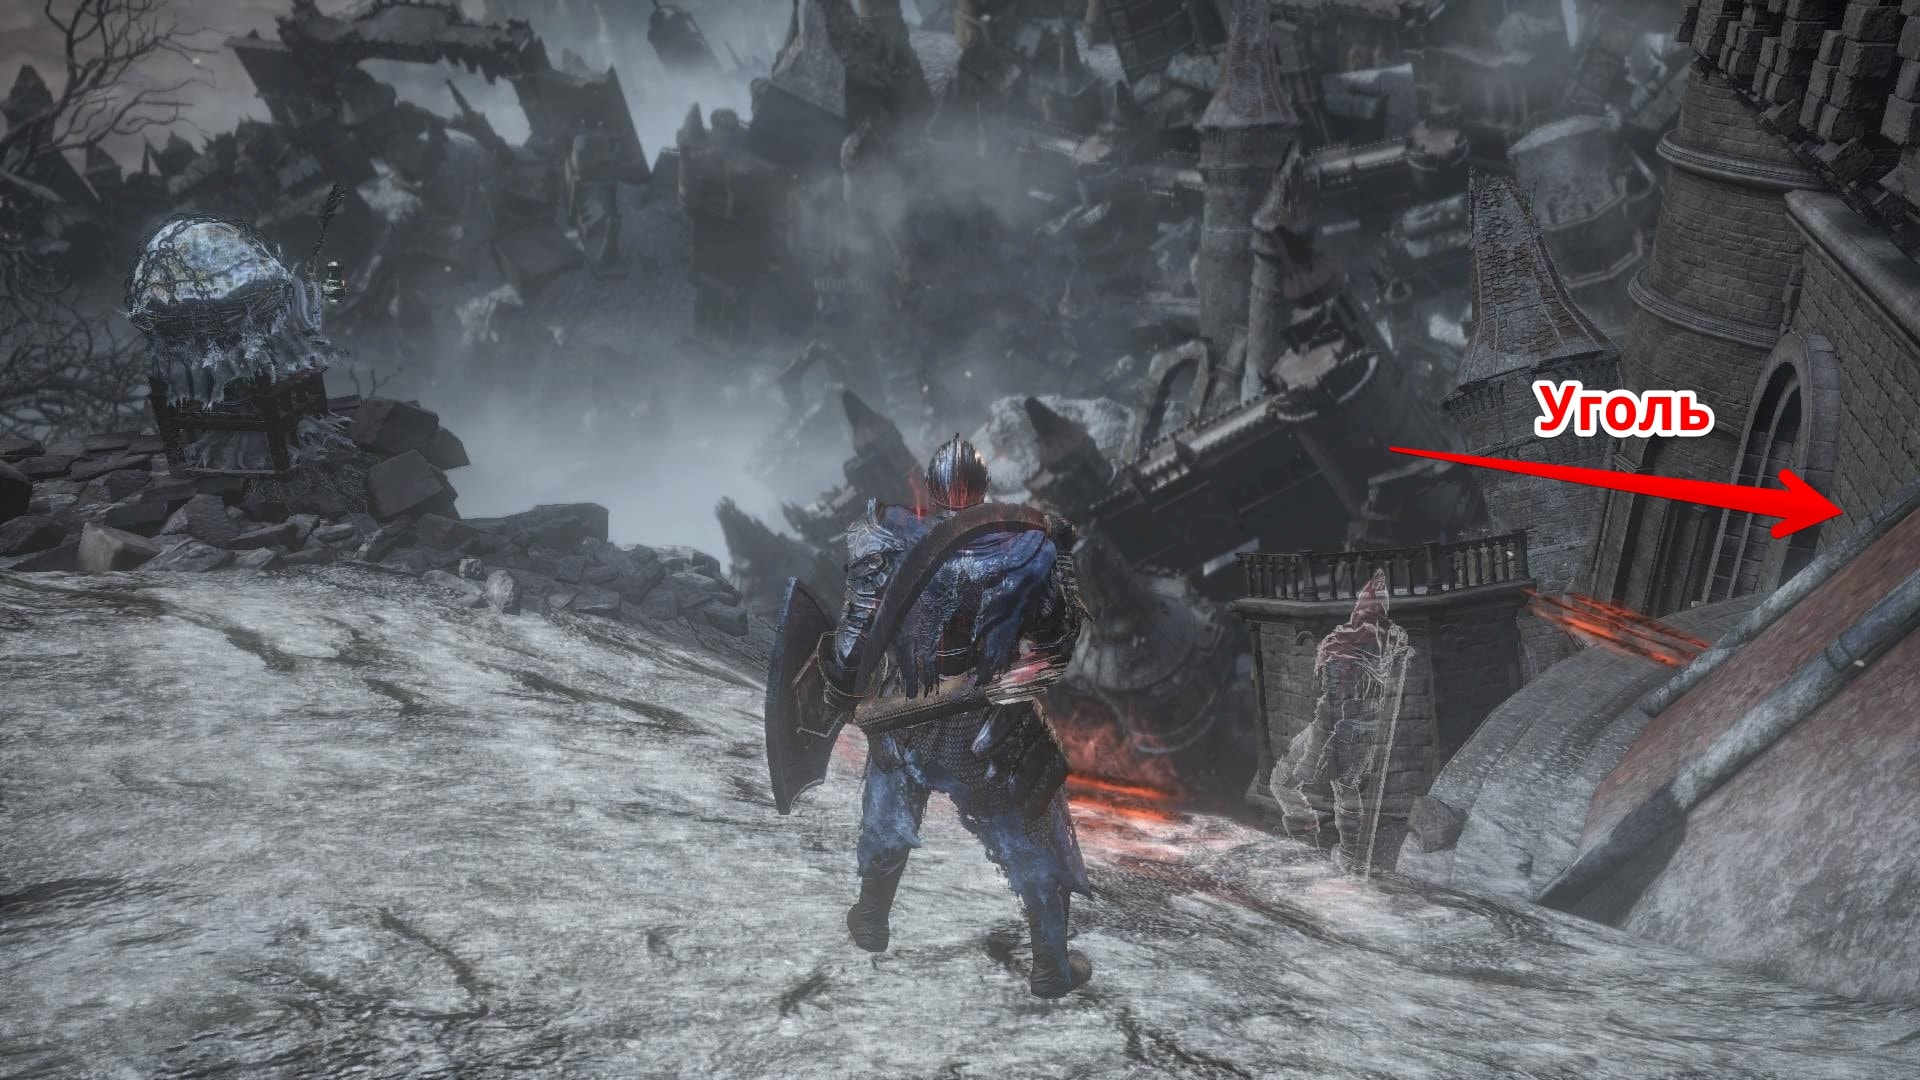
If you have more than enough courage and nerves, then you can try to pick up the "Heavenly Blessing" (Divine Blessing), which will lie behind the place where you landed. Although still the most reasonable option would be to hide behind a cover (a dilapidated turret a little further). At this point, you can avoid careful shelling, get to the next nearby building and pick up four "Lightning Urns". And one more important point: when the end of the angel comes, do not forget to return to this place and look around the corner. The bottom line is that here you can find the "Ring of Steel Protection +3" (Ring of Steel Protection).
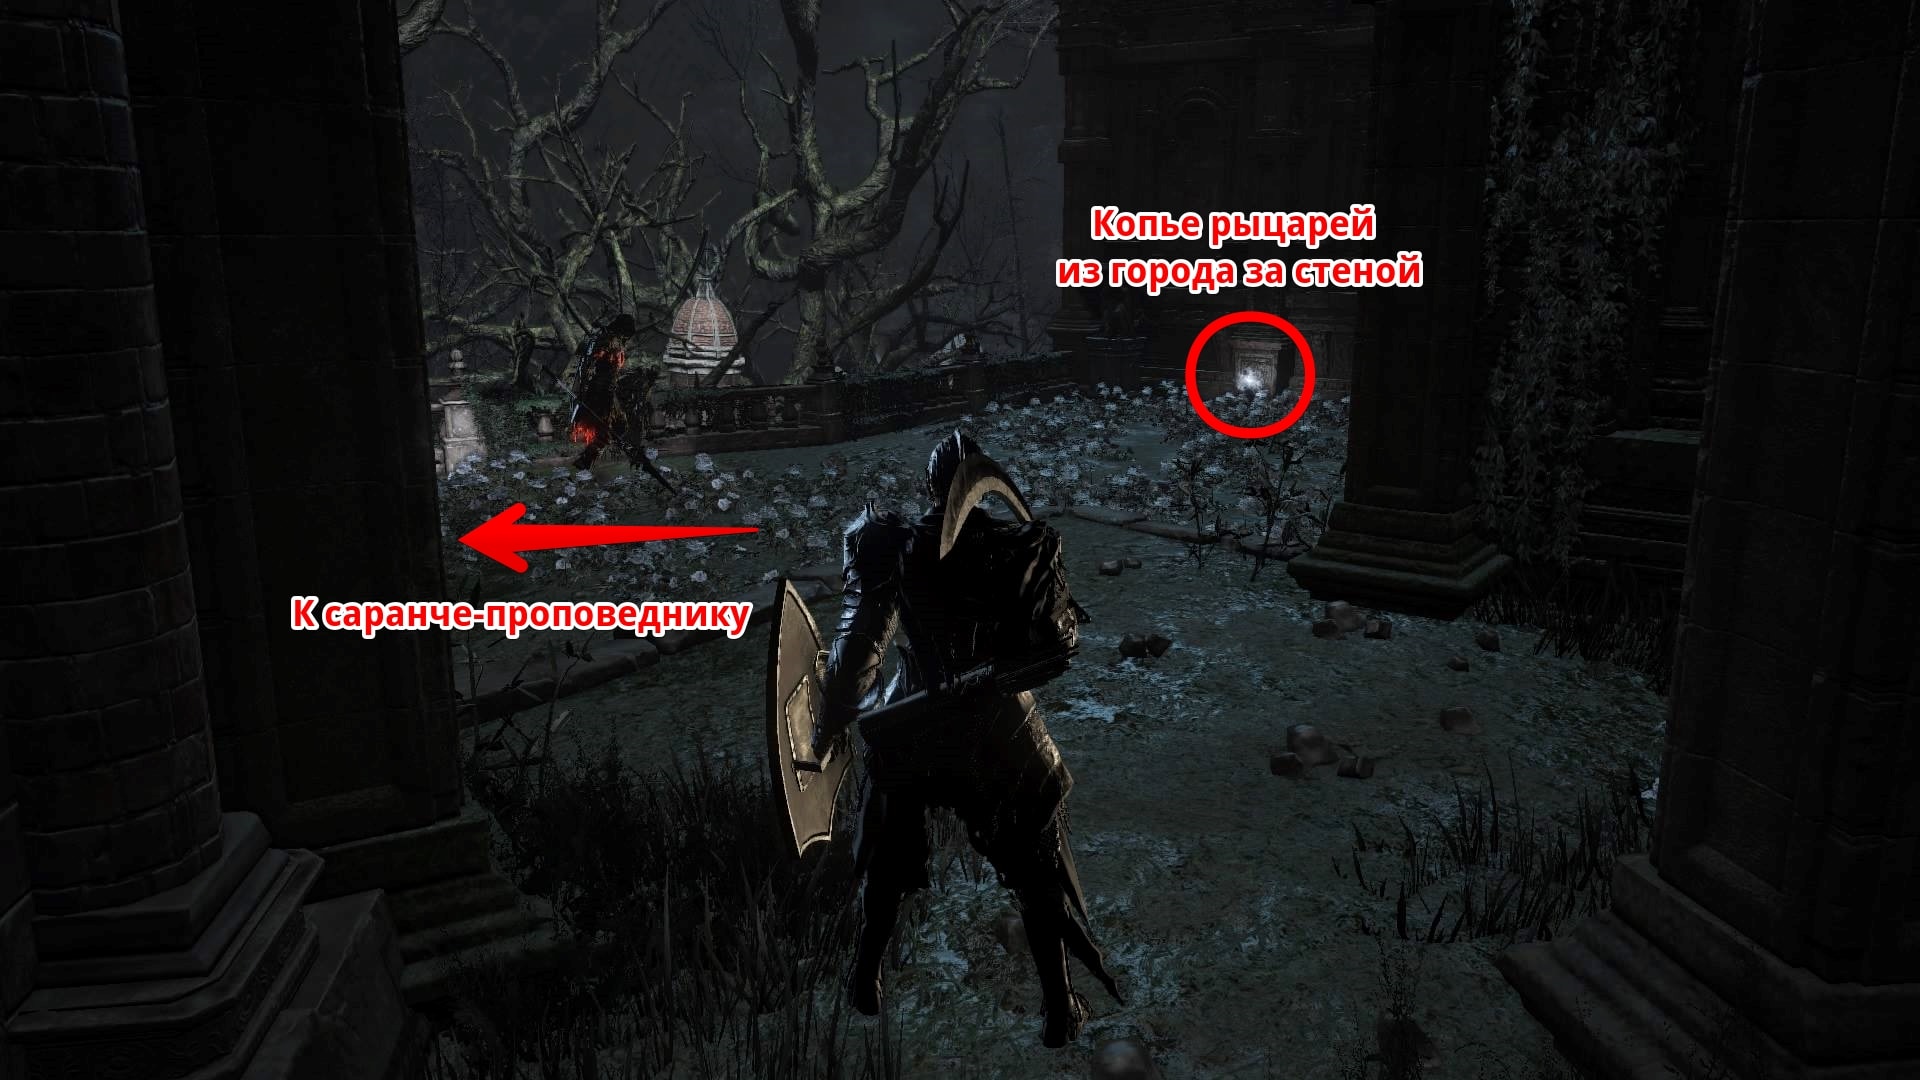
Keep moving on. The next key point in this walkthrough is the ruined church, where two knights of Lothric will be waiting for the hero. One of these two knights will wield a huge battle banner, which plays the role of a spear, and the other knight - a sword. I highly do not recommend fighting with two knights at the same time. As a rule, the swordsman will run first to the hero / heroine, ahead of his comrade-bearer. So the faster you deal with the first knight, the more comfortable it will be to fight, taking on the second warrior. The weak point of any knight is the back. Therefore, these two soldiers are no exception.

The death of this strange creature is the solution to many problems in the initial locations of the "The Ringed City" expansion.
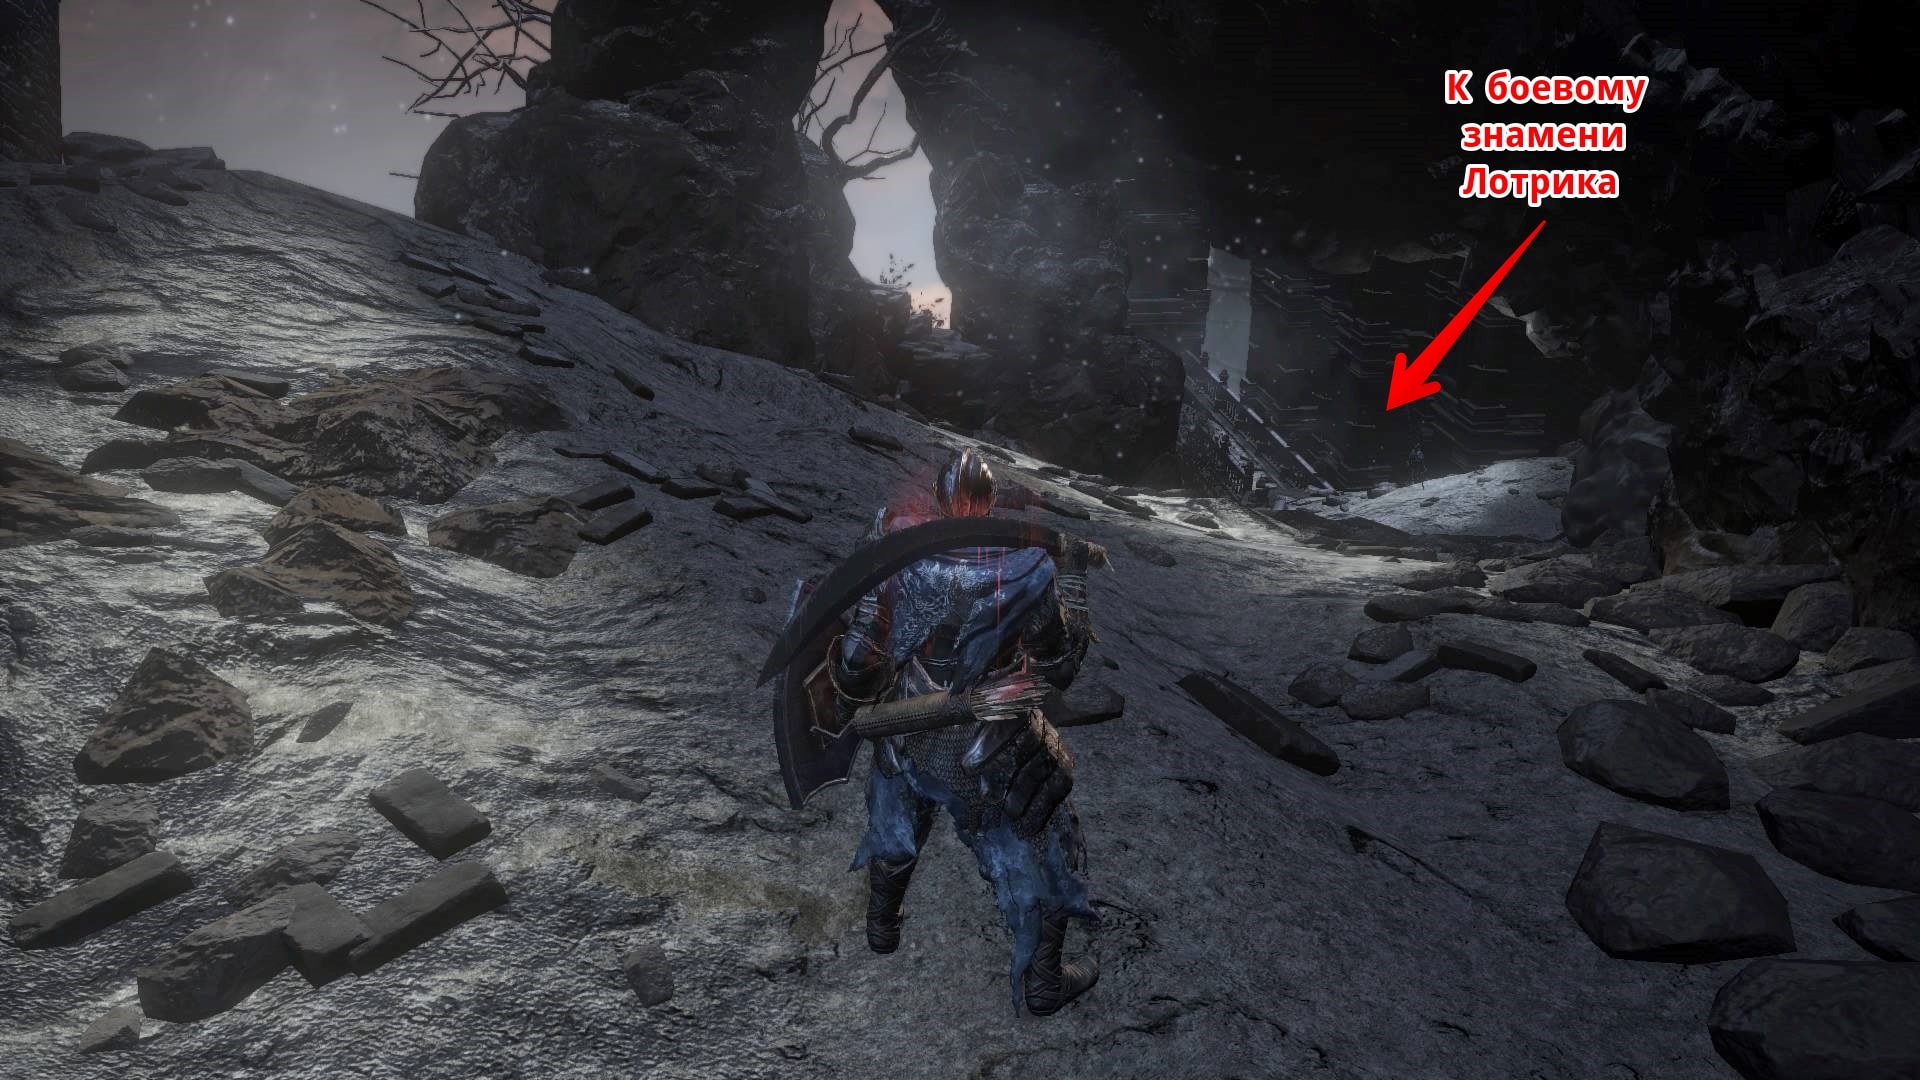
For the victory over the last knight (who carries the banner with him), you can get a "Chunk of Titanite". And near the altar there will be a Soul of a Crestfallen Knight. After taking the soul, go outside. On the street, go to the left side - at the same moment a tower will collapse on the chapel right behind the character's back. Now a very important point: kill the defenseless creature. What for? Thus, it will be possible to get rid of the angel forever, and plus everything to get two pieces of "Shimmering Titanite".
... Path: "Descent to the Ruins of Earthen Peak"
It's time to go back to the chapel exit and turn to the right. So, behind the fountain, near which the dead knights of Lothric have successfully settled down, it will be possible to find "Rusted Coin" and several inhabitants of the Depths. Therefore, as soon as you deal with them, climb the stairs straight into the building next to it.

However, before you go inside, keep in mind that the enemies will respawn there endlessly, so I recommend you just run forward (along the way, you can grab the Titanite Chunk with you, if, of course, you don’t miss it or return for it a little later, when with enemies will be finished). You should run until you come across the "Murky Longstaff". However, try not to waste time, so hit the illusory wall on the left side of the boxes and thus open the passage to the second floor.

First of all, at the top, kill absolutely all the inhabitants of the Depths (while keeping in mind that some of them can turn into living shells). As soon as you kill them, no one else will appear on the first floor, so you can quite calmly pick up the "Coal" (it will lie behind the boxes, which, in turn, are on the left hand) and the spell "Waste of the great soul" (Great Soul Dregs). And as soon as you take all these items, jump further to the parapet, which can be seen in the screenshots above, and then you will stumble upon the Covetous Silver Serpent Ring. But that's not all, because you can get to the next location in two available ways.

The first path is through the arch behind the ruined tower. Moreover, in this case, you will have to fight several inhabitants of the Depths and one legionnaire of Harald on the way. However, first of all, you still need to deal with the sorcerer who summons the "sliders", after which you can already take on the legionnaire. After a long duel, collect the things scattered nearby ("Chunk of Titanite" and "Bones of Return" in the amount of three pieces). As soon as you collect the items, you can jump to the collapsed mill far below. Do not be afraid.
From the parapet in the distance, there are two options for how exactly to kill Legionnaire Harald. The first option is to shoot him from above. The second option is to land on his head and thereby instantly kill.
The second path involves a path through the broken wall in the chapel and two knights inside the tower. However, if you do not burn with desire to fight, then you can run through the Lothric guards with peace of mind (and, just in case, you can restart the game to protect yourself from possible pursuit by enemies). In any case, you will need to talk to the lost memory warrior named Lapp. Kill the inhabitant of the Depths ahead and jump into the abyss on the right side, in fact, from the parapet.

If you don't want to complicate your already difficult passage, I recommend finishing off the knight in this passage.
A little further ahead, another standard-bearer from the guard of the knights of Lothric will wander - I recommend attracting his attention and killing him, and then go out to a fairly open area. So on this site your character will already be waiting for a couple of the inhabitants of the Depths. You shouldn't hesitate with them, so sort it out as quickly as possible and grab the Projected Heal.
The corridor below will be patrolled by two knights of Lothric. I recommend that you try with all your strength to fall on the head of one of the knights, because this is the only way to make the battle easier for yourself. In any case, as soon as you deal with the enemies, be sure to take the Large Soul of a Weary Warrior, which lies nearby. Then turn the corner and there you will already stumble upon the Lothric War Benner, which, as you may have noticed, is used by some knights. Otherwise, as in the previous case, without any fear, jump down through the hole that is in the fence. And now, when you finally find yourself at the foot of the mill, you will be able to notice the long-awaited bonfire.

Location: "Earthen Peak Ruins" (All Secrets)
♦ : Complete walkthrough of the "Earthen Peak Ruins" location in the latest "The Ringed City" add-on for the original Dark Souls 3. Location of all secrets, collectibles, all enemies in the location, helpful tips and tactics for passing.
So, the Earthen Peak Ruins is the second area in The Ringed City that you can get to after you get past the Dreg Heap. Earthen Peak, or to be more precise, what is left of it is the ruins of the once huge mill from Dark Souls 2 - coincidentally also one of the most disgusting and unpleasant locations in the entire game.
So this guide will help you completely go through this location, find all the useful items, deal with the most powerful enemies and will simply help you not to get bogged down in this terrible poisonous swamp among the ruins of a once majestic building.
... Path: “How to kill the first Angel? Road to the Boss "

Well, light a new fire, after which you must talk to the NPC named Lapp - this is a knight who has lost his memory, whom you may have met earlier. This time Lapp will tell about the treasure, which, it turns out, lurks in the vast swamps nearby. Moreover, if your character dies (and most likely it will be so) while trying to overcome this part of the location, then the knight Lapp himself will get the coveted item, which will become - "Titanite Slab".
A little further ahead, a local Angel will be waiting for you, who will immediately unleash a hail of magical and powerful arrows on the hero / heroine. So, in order to fully and thoroughly study the entire location, you will have to get rid of the winged monster and nothing else.

And this can be done, as they sometimes say, without leaving the checkout. Move in large dash-dashes from cover to cover to get to the building shown above in the screenshot, then press against the wall to the left and jump onto the root protruding slightly below (and it is quite possible that this move will take more than one attempt, so you will have to try ). So, on the site a little further than the character, the host larva will be waiting (otherwise there is no way to describe this monster), which is responsible for the Angel (she controls him).

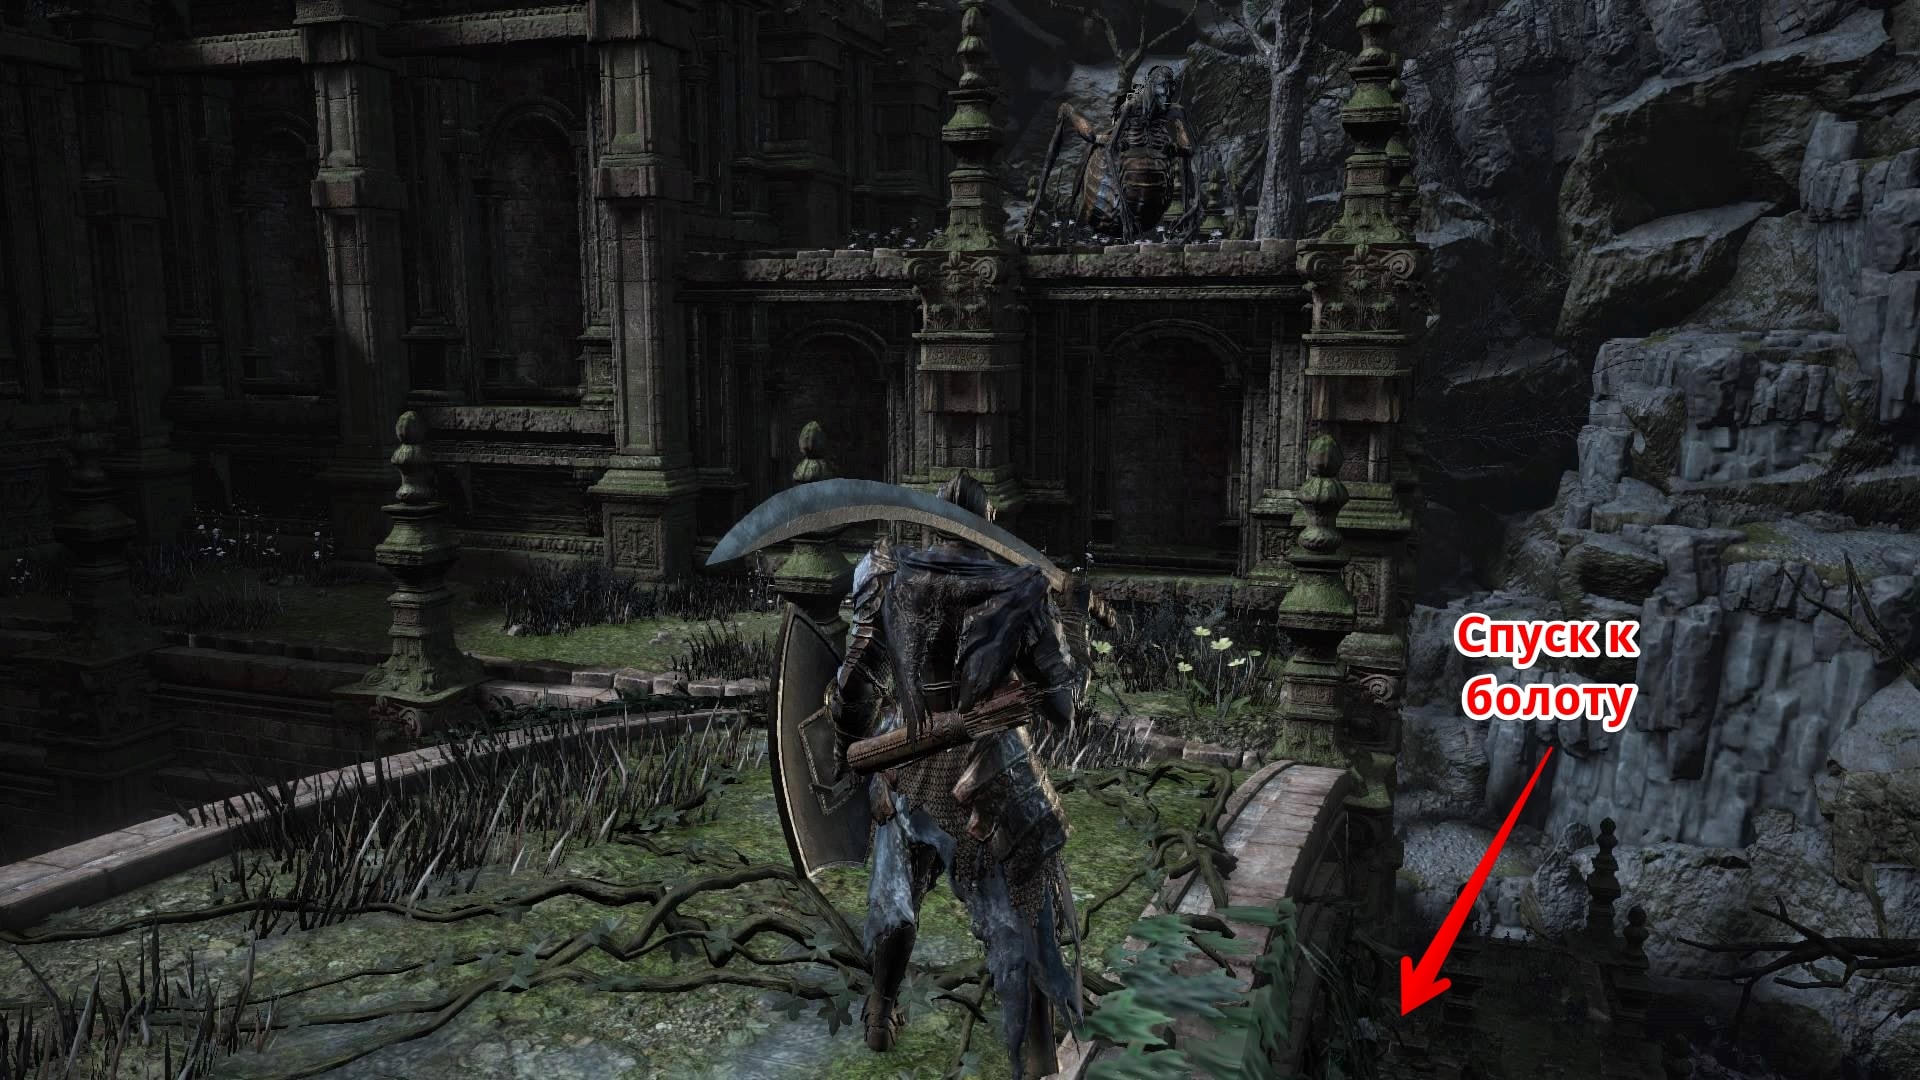
After killing the larva, pick up the two dropped fragments of "Twinkling Titaninte", and then pick up in addition to all the "Coal" (Ember), which lies nearby. Then climb higher along the massive root to the very top of the mill. On the left side of the character on the roof, you can also find Divine Blessing.

From the same place, you can jump straight to the next bonfire, which in turn will mark the battle with the Boss. Nevertheless, as part of this walkthrough, I recommend not to do this for now, because there is still a lot of interesting things in these swamps.

But let's get down to business. So, now that the Angel in the sky no longer interferes with freely moving around the territory, it's time to carefully study the location. Go back to the bonfire. On the left side of this fire will be a "pack" of poisonous horned beetles, which are guarded by "Black Firebomb" (Black Firebomb) in the amount of four pieces. A little further on the right hand, you can find a huge root, along which you can climb higher and get a shard of "Shimmering Titanite", so do not miss it.
Now go back down and look inside the dilapidated wooden building on the left hand of the character - in this place, two thieves from Lothric will be sitting in ambush. And after killing these thieves, the "Desert Witch's Robe" will drop out - this is part of a set of armor that can be collected in this location. In addition, next to one of the large stones lies another Titanite Chunk, but a little further in the dilapidated tower behind the large roots on the right side you can find the Titanite Scale.

Then go down the slope below (the slope is located near the building from where you once jumped to the larva that guided the Angel). On the way, you will have to deal with another thief, but this is not a problem. The main thing is that at the very end of the trail of this slope you can find the "Giant Door Shield" on the very extreme part of the cliff.
... Path: "Second Angel and the Swamp"
After following the guide above, you have thoroughly and thoroughly studied the area where the first Angel flew and raged, you must already go towards the swamp. In order to get to the swamps, you first need to go through a small tunnel, which in turn is formed immediately after the fall of the old tower - inside you can find another thief + the second one will wait below, but the main thing is that in this place you can find "Coal ".
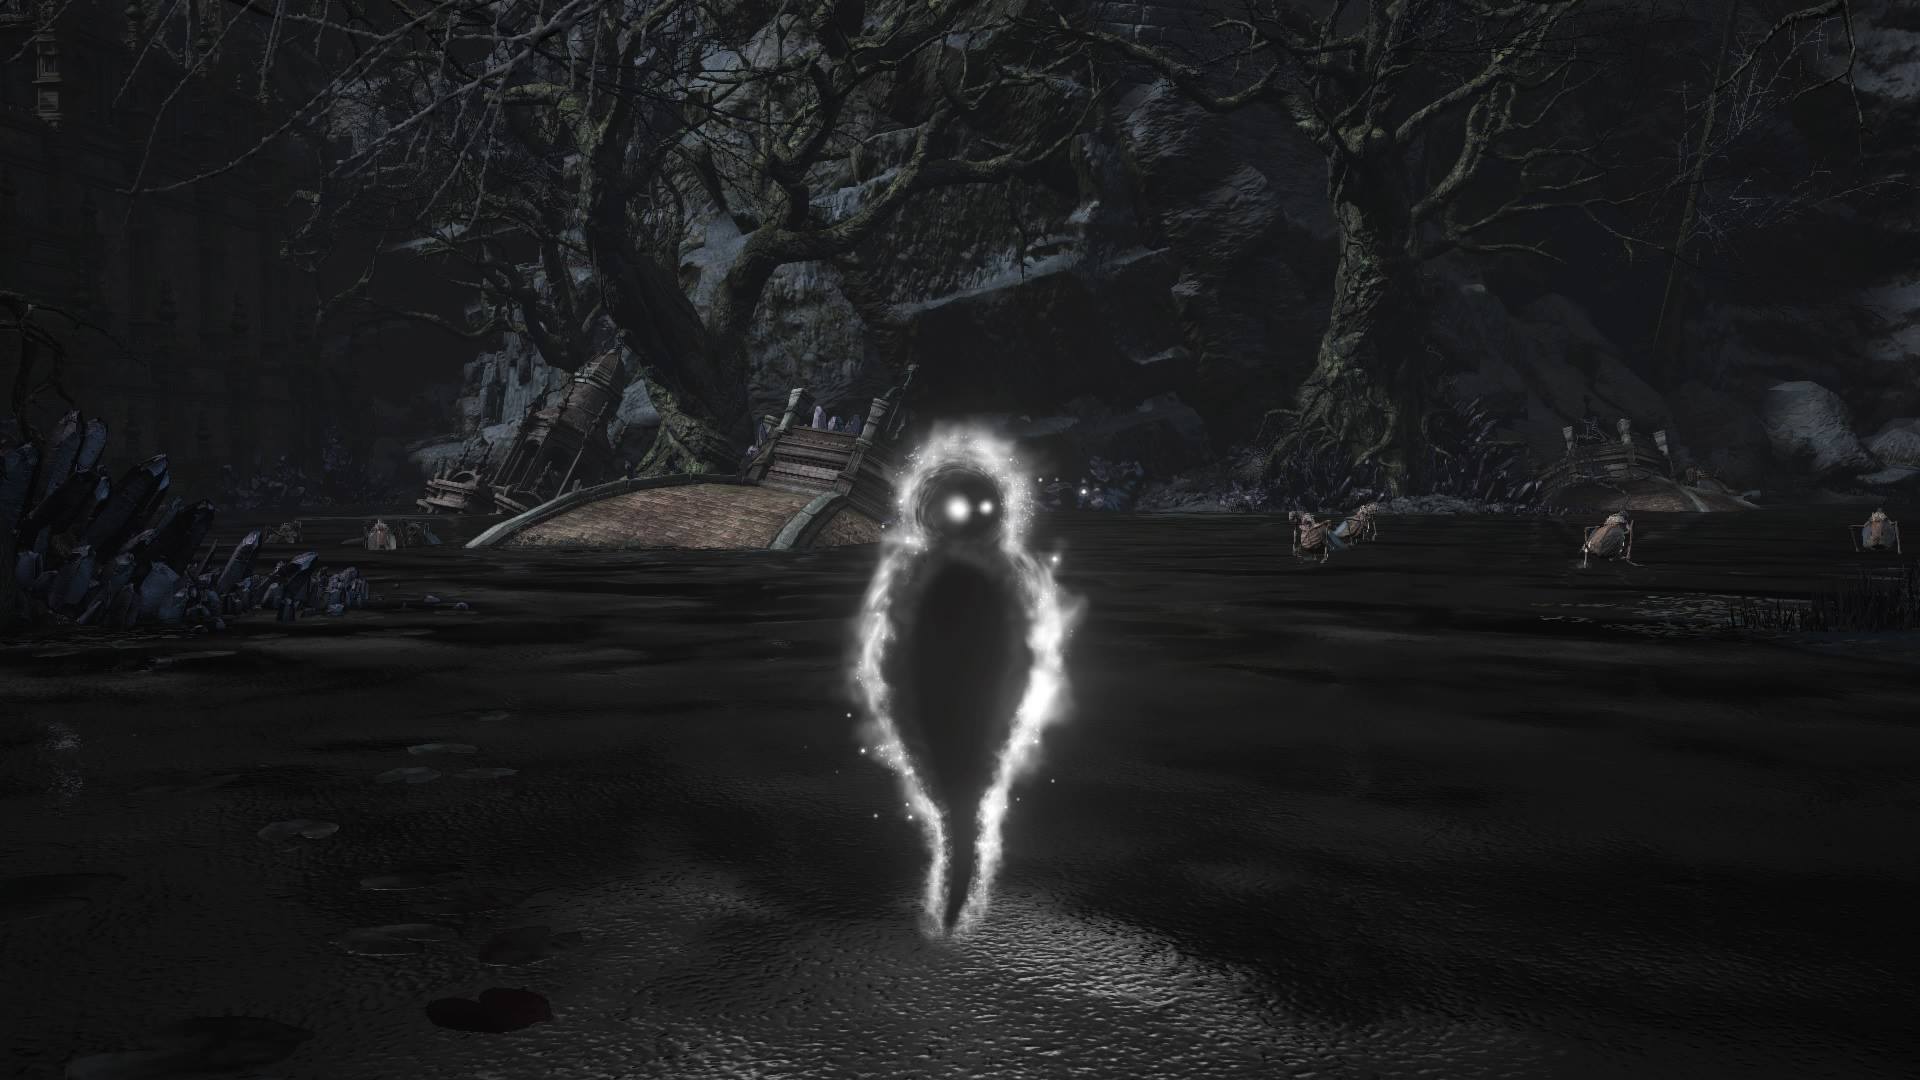
In any case, after that you have to jump down to the swamp, where, in fact, the meeting with the second Angel will take place. And considering that the area is now more open, I recommend not to neglect a variety of shelters. However, this is not all there is to be afraid of. The second problem with swamps is fog. The bottom line is that if the character stays in one place for too long, he can fall under the influence of the fog that the Angel creates around him in order to impose a curse on him.

Therefore, like last time, the main task is to eliminate the Angel. To do this, move forward, simultaneously hiding behind all sorts of wooden buildings, roots, stones and other objects. The first step is to get to the place indicated in the screenshot above. So upon arrival at the indicated place, climb up the huge root and then jump onto the rooftops on the right side. On the rooftops, the hero / heroine will encounter a thief, so kill him, go a little further and finally kill the larva. For this, in addition to the fact that you will enjoy the massacre of the next Angel, the character will receive, in addition to everything, a fragment of "Shimmering Titanite".

After the larva has been killed, you no longer have to worry about the Angel, so you can safely go to explore the territory. In the local swamp shack opposite the entrance, you can find two horned beetles that will guard the Purple Moss Clump, which is able to prevent the spread of poison in the character's body. And as it is not difficult to guess, on the territory of this swamp the object will be just in place.
The ring also needs to be found in order to advance the storyline, which is associated with the knight Lapp. Lapp will leave behind only a mug of Sigbrau in the same place.
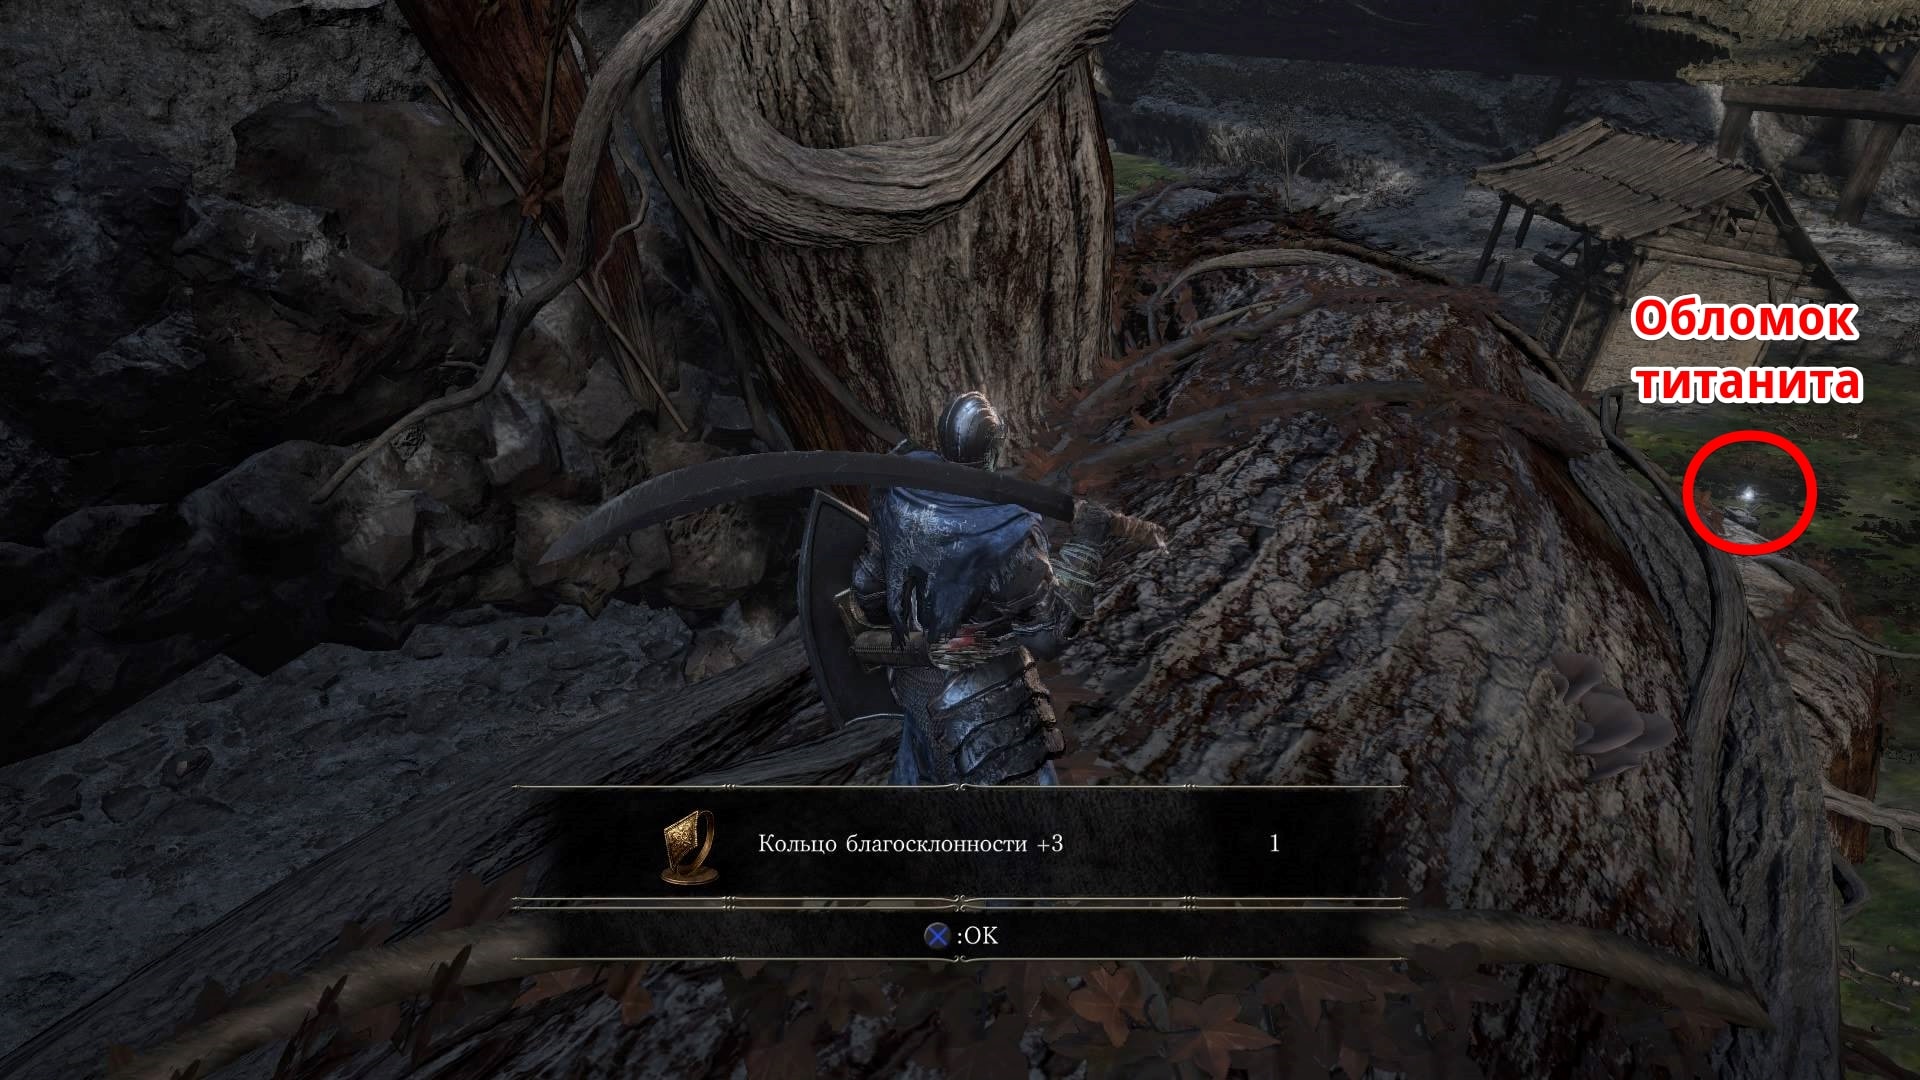
On the right side of the same place, on a small ledge, and again surrounded by huge beetles, you can find "Gloves" and "Desert Witch's Skirt", which belong to the aforementioned set of equipment. In any case, do not linger and climb up the massive root nearby to find the Ring of Favor +3. At the same time, try to behave carefully, because from the side of the hero / heroine the next thief will meanly await. After killing the thief, turn around and jump to the large root, which is a little lower - here you can find another "Chunk of Titanite".

But already in the cave right above this place you will stumble upon one of Harald's legionnaires, accompanied by a dozen beetles. Kill them all, but be careful and then, if you win, you will become the proud owner of the Large Soul of a Weary Warrior. In addition, I will also note that if until this moment you did not bring Lapp a piece of titanite, then now it will be possible to find it in the cubbyhole on the left side of the large beetles. But first, however, you have to kill a couple more healthy legionnaires.

Opposite the same cave in the center of the swamp will be waiting for its hero "Big Soul of a Tired Fighter", and a little further - another "Chunk of Titanite". On a small island nearby, surrounded by a couple of horned beetles, you can find the "Loincloth". In addition, from this place you can see the passage, which is under the strict protection of a bunch of powerful roots. However, getting inside is not difficult, so head to the aisle. But once inside, you will have to fight the legionnaire (and he will hide around the corner on the right hand of your character). After repelling the blow and killing this dastardly enemy, be sure to pick up the Harald Curved Greatsword, and then climb higher up the slope - there will be a thief near the cliff who is guarding the Homeward Bone. So kill the enemy, take the item and move on.
... Path: Desert Witch Zoe
Well, jump down to the root and climb it straight up to a shining object a little further, which will still lie on the branch next door. When you get to the object, it turns out that this is another "Chunk of Titanite". In any case, do not linger and just move up to the entrance to the next cave (on the right side, by the way, there will be the roof on which the maggot commanding the Angel once sat), kill the thief with the enchanted flamberg on the way and continue moving forward.

During the fight with the "Desert Witch Zoe", she can use the Estus flask twice.
Now next to meet your hero / heroine will be "Desert Pyromancer Zoey", accompanied by two thieves. So, I recommend first of all to kill the thieves so that they do not get in the way of corny, while trying to follow Zoe more often, because she will throw fireballs. And after killing the thieves, you can safely take on the witch herself. There will not be so many techniques in a woman's arsenal, but their scarcity compensates for their effectiveness, so be careful.
From a distance, the witch will try to hit the hero with fireballs. And she will do this until you decide to come closer to her, and you have to do this if you are fighting in close combat. So, at short distances, Zoe uses pyromancy, or rather "Fan of Flame" (Flame Fan). By the way, the character will receive this spell as a reward if he kills the witch + receives “Conflagration” and a whip. When the witch takes damage, she tries to roll to the side. it will be possible to prevent this maneuver either with the help of some fast weapon, or by holding the witch in a corner (which will be quite difficult, and not only because of endurance, although she will need to be given special attention).

When you manage to defeat the evil witch, be sure to pick up six pieces of "Prism Stone" near the wall on the left and a little thing called "Desert Witch's Hood" near the exit from the cave. Moreover, if you followed this passage and got rid of two Angels, then the path further will be absolutely safe, so in addition to everything nearby, on another adjacent branch, you can safely pick up a piece of "Shimmering Titanite". When you take it, go to the very end of the root, from where you can jump onto the tumbled down and dilapidated tower (in order to make it easier to navigate, the screenshot above is presented).
When you land on the ash (otherwise the character will suffer a little), go down to the larva, which will protect the first angel (if suddenly you have not done this yet - this is a very important point), then use the developers' advice and take a step straight into the abyss ... Do not be afraid, because the fall will be harmless, and below you will stumble upon the next bonfire. Therefore, all that remains to be done in this location is to kill the Boss. But more on that below.
Location: "Observation point of the mausoleum" (All secrets)
♦ : Complete walkthrough of the location "Mausoleum Lookout" in the latest addition "The Ringed City" for the original game Dark Souls 3. The location of all secrets, collectibles, all enemies in the location, useful tips and tactics for passing.
So, the location "Mausoleum Lookout" (The Ringed City) is a location surrounded by a line of rocks in the "The Ringed City" add-on for the original game Dark Souls 3. This area is an ancient, in many places covered with thickets in ruins of the city, once transferred in the possession of the pygmies by Gwyn himself.
This guide (full walkthrough) will help you find all the useful items and things in the "City Behind the Wall" location, as well as go through the most dangerous and difficult enemies and, in the end, will reveal the secret of how to avoid falling under a hail of arrows on the top of the city behind the wall.
... Path: "How to get through the ghost archers?"
After you deal with the Demon Prince, the guide to which can be found here or in the guide above, pick up the messenger's flag near the new fire and move further down the stairs straight through the tunnel. At the very edge of the cliff (at the end), you will need to poke the same previously found flag into the ground. When you do this, then flying demons will fly to the hero / heroine and transfer the character to the next location, so you should not be afraid of them.
And once your character is on solid ground, rotate 180 degrees and grab the Titanite Scale. Then go down the stairs to the fire below. Along the way, be sure to talk to the "Pygmy Lord" lurking in the gray grass, who, by the way, will tell you about how to get the "Dark Soul".
And although the scenery here is pretty beautiful, the "Mausoleum Lookout" is a rather inhospitable and dangerous place. Basically, of course, it's all because of the Judicator Giant on the opposite side. The bottom line is that as soon as he raises his hands, a whole horde of ghostly archers rises from the ground in an incredible way, which destroy the hero / heroine in the blink of an eye.

So, in order to prevent another death, go down to the wall below, and then take cover behind the first line of gravestones in front. And all this should be done as quickly as possible. As soon as the first attempt to hide behind shelters is successful, wait for the moment when the phantoms disappear again (they usually make three hail of arrows, after which they disappear and appear back), look quickly under the stairs behind, along which you went down to the phantoms. There you can find the complete Ruin Set straight from Dark Souls 2.
What to do next? Now you will need to move in short and small dashes forward from one tombstone to another, while moving at the moment when the phantoms disappear. You need to get to a round platform, from which you can then jump onto the dilapidated bridge. Moreover, as soon as you do this, then, most likely, a skeleton will come to you, so you have to kill it, because it interferes too much. However, you need to kill him at the moment when you find yourself below.
After you find yourself again on solid ground, look carefully - behind will be a tempting Soul of a Crestfallen Knight. In addition, there will be a Crystal Lizard on the opposite side of the bridge, so try not to miss it. Catch up, kill the lizard and get additional titanite. However, be extremely careful, because there will be too little room to maneuver, so you can easily fall down.
So now it's time to go up the stairs at the very end of the balustrade. At the top, you will need to immediately take cover behind another row of gravestones (the screenshot above will help to determine the place more precisely). Soon two skeletons will go to meet the character, but it will not be difficult to deal with them even in conditions of regular shelling - the main thing is not to leave the shelter. So, on the site a little higher, the culprit of this whole performance, the Giant Judge, was also successfully located. Therefore, go up to his platform, where he stands, turn to the right side and run further down the stairs. You need to run until you come across a representative of the local locust race - now the character will be safe.
... Path: "How do you kill the Giant Judge?"
So, if you want to fully explore the territory occupied by phantom ghosts, then you will definitely have to kill the Giant Judge. However, before you take on this business, you should know that this mini-Boss has one unique feature: it will respawn after the death of the main character, so before you start moving on, make sure to collect everything you want.
However, in fact, the Judge himself does not pose any particular danger. Fighting with him in close combat, he can only punch the character with his fist, because the greatest danger can only be summoned ghost warriors. On the platform where the giant stands, there is a place for a couple of archers and a knight who wields a rather impressive hammer.
In general, if your character is a melee fighter, then you will have to settle down near the only convenient line of gravestones in the entire area of the Judge - this line of plates will protect you from a hail of arrows. The intervals between the attack and the appearance of archers must be used in order to inflict on the Giant Judge from two to three blows, and then return back to the shelter and sit out until the next opportunity. But the biggest problem is that the whole process will be complicated by the knights, although they start and end their attack (and the only one), standing in one place, so skillfully using the situation, they will not cause any problems.
But if you still prefer long-range battles, then you will have to take a position in the middle of the stairs that lead from the judge to the friendly NPC. So the bottom line is that in this case, the archers will not appear. The only one who will appear is the knight, so after having dealt with him, run upstairs, make a couple of shots and return back to your secluded "burrow". You will have to fight this tactic to the bitter end.
... Path: "Clearing the area and the path to the fire"

As a reward for your labors, you will receive only "Divine Blessing", but for which the character will get only once, no "farming". In addition, the death of the Giant Judge indicates that the entire main part of the location is now available for full exploration, so do not miss and collect the following things: Large Soul of a Weary Warrior, Coal ( Ember, Green Blossom in the amount of four and Titanite fragments in the amount of two. Finally, be sure to look into the small tomb under the platform, where, in fact, the Judge was sitting, because there you can find the "Hidden Blessing".
After collecting things, you can return back to the talkative locust in order to go down the stairs from it. Go until you see in the distance a pygmy (a resident of this very city), which will have a hood. However, if you try to approach him, then his other kind will try to push the hero / heroine into the abyss. Therefore, having dealt with the aggressor, attract the attention of the second pygmy, because another one will be waiting for you on the ceiling. In general, kill all enemies and keep moving on.

Soon in front you can see another luminous thing, which, by the way, will be guarded by the pygmies: the first pygmy will hang from the right edge of the balustrade, the second pygmy from the far, the third one is waiting on the wall. But as soon as you clear this part of the location and take with you the nearby Purging Stones, you can finally look into the passage that is located on the left hand - then you will find the next bonfire.
Location: "Inner Wall of the City" (All Secrets)
♦ : Complete walkthrough of the "Inner Wall of the City" location in the latest addition to "The Ringed City" for the original game Dark Souls 3. The location of all secrets, collectibles, all enemies in the location, helpful tips and tactics for passing.
The Ringed Inner Wall location is the second and much more extensive area than the section of the city outside the wall from The Ringed City expansion for the original Dark Souls 3. So, this piece of the location is quite a long descent to a huge swamp that was once the streets of this forgotten place. This guide is intended to help you find all the existing useful items, to cope with especially dangerous and powerful enemies, and, in the end, the passage will simply help you not to get lost on the way to the flooded part of the city outside the wall.
... Path: Ambush and the Knight from the City Beyond the Wall
So, if it seemed to you that the upper part of the city behind the wall was too tough and ruthless in relation to your hero / heroine, then get ready for the fact that on the territory of the "Inner Wall of the City" dastardly and unexpected ambushes will lie in wait for the hero at almost every step ... And yet, almost any skirmish with the enemy can be avoided if you set yourself as a target to get to your destination as quickly as possible. However, as part of this walkthrough, I, of course, will not do it.

So, first of all, pay attention to the fact that there are as many as three exits from the room with the fire, one of which (in this case, the one on the left side) will be blocked for the time being. The corridor on the right side will lead you to a balcony where, provided that you have moved the storyline a little further, you can find Lapp - a knight who suffers from amnesia and who this time is looking for the "Monolith of Purification" (Purning Monument) ... And all in order to restore the lost memory. However, now you will not be able to help him in any way, so you just take a present from the poor fellow in the form of a "Sigbar" and pick up a nearby "Coal" (Ember).
Now go back to the fire and proceed through the last accessible doorway - around the corner on the left side, an aggressive Pygmy will be waiting for you in ambush. So, after killing him, go further to the stairs in front and quickly jump back so as not to get hit by another aggressive local resident (but this time with crystals sticking out of the enemy). And unlike its more humanoid relatives, this variant of the pygmy will move on all fours, while spreading a curse around itself. Therefore, it is better to deal with such enemies as soon as possible and best of all from afar.
But in any case, after the fight with him, go down the stairs below and on the way finish off the "corpse" of another pygmy + get ready for the next sudden ambush - a little further on the character's site several local residents will be waiting. Therefore, as soon as you deal with them, go down the stairs on the right side and pick up an item called "Hollow Gem".
Then, having reached the site, which is covered with white flowers, you will have to fight the very first "Knight from the city beyond the wall" (Ringed Knight). They are primarily distinguished from ordinary warriors (of a similar rank) by the fact that they have a ring of fire in their chest. The second major difference is the choice of weapon. The whole "salt" is that the weapons of such knights can ignite freely and therefore cause additional damage.
In this case, the knight will carry a small shield with a dragon's head and a sword. Moreover, the shield has one small, but very important feature - it can spew fire like a flamethrower. Therefore, always try to be vigilant in battle: the attacks of these guards are very fast and can reach even a slightly stagnant person at a decent distance. However, like any other knight, they have one drawback - this is a vulnerable back. And for the victory, you will be able to receive "Titanite Chunk" in the amount of four pieces, "Coal" (Ember) and the components of the required set of armor.
After you deal with the knight, then at the far end of the site, turn to the right, then kill the pygmy spreading the curse and then be sure to pick up the "Titanite Chunk". After that, you can safely attract the attention of the pygmy lurking in ambush (in this case, on the wall) (the screenshot above will help determine the place). Kill the pygmy from above, then switch to the one that is hiding around the corner on the right side.
... Path: Harald's Humpbacked Pygmies and Legionnaires

As soon as you get into the courtyard of a small church (where, by the way, you will follow), a cleric moving on his four "paws" will run out to meet the character, who will look more like a turtle. So, when fighting with such creatures, you can never stand in one place, because, being at a distance, they can calmly use offensive spells and pound the hero / heroine well. In addition, because of this parody of a turtle, every few seconds a glowing circle will appear under your feet, which will cause quite a lot of damage.
So, therefore, it will be easiest to get close to such an opponent and start after that to inflict a bunch of blows. At a short distance, they practically do not pose any danger (in close combat, these "turtles" have only self-healing and a couple of weak attacks, but no more). The only thing a pygmy can do is hide in a shell to reduce the damage it takes. However, two or three powerful blows - and the monster will immediately overturn on its back, after which it can be safely finished off.

But inside the church you will be trapped by three more such pygmy clerics, on whom you can even practice a little in extermination. One floor below it will be possible to find another "hunchback", but to get to him, you must first jump very carefully onto the chandelier in the very center of the room, and then jump from the chandelier to the second tier. And as soon as the next hunchback pygmy is killed, be sure to pick up a piece of "Twinkling Titanite" (Twinkling Titanite).
The lowest floor will be patrolled by another version of the knight from the city beyond the wall, only slightly different: this one will have a spear and a large shield with a dragon's head. This time, the knight's shield can stun the enemy for a second, and the owner of the shield can give additional stability for a while. In addition, if you decide not to kill the cleric-hunchback-turtle on the second floor, then prepare yourself for the fact that you will have to dodge his attacks.

And yet, as soon as you finish dealing with the enemies in this area, pick up the "Shriving Stone" near one of the columns, and then go outside. On the street you will find yourself on a massive staircase, along which three Harald Legion Soldier will begin to climb to your character.
Cross the street, thus turning to the left. On this side, immediately deal with two pygmies, which in turn lurked on the bridge. Move as far as possible to be undetected. Now you need to wait for the moment when the big guys disperse: one of them will take a position in a niche nearby, and the second will turn back, without even reaching the character, but the third will have to fight. While on the bridge, if you try, you can deal with three legionnaires. How to do it? To do this, it is enough to jump on the heads of the legionnaires in time. It is necessary to calculate the time of the strike, because, otherwise, by killing one bruiser, you can provoke the second and thereby get big problems.
In any case, when you get rid of the two legionnaires, climb to the very top of the stairs and kill the now last legionnaire in the fall. Pick up the "Titanite Chunk", which, by the way, will be guarded by the legionnaire. But that's not all, because on the way to the wreck, the pygmy-cursers will suddenly come to life (there will be two of them in total), so kill them quickly, take a piece of titanite and move on.

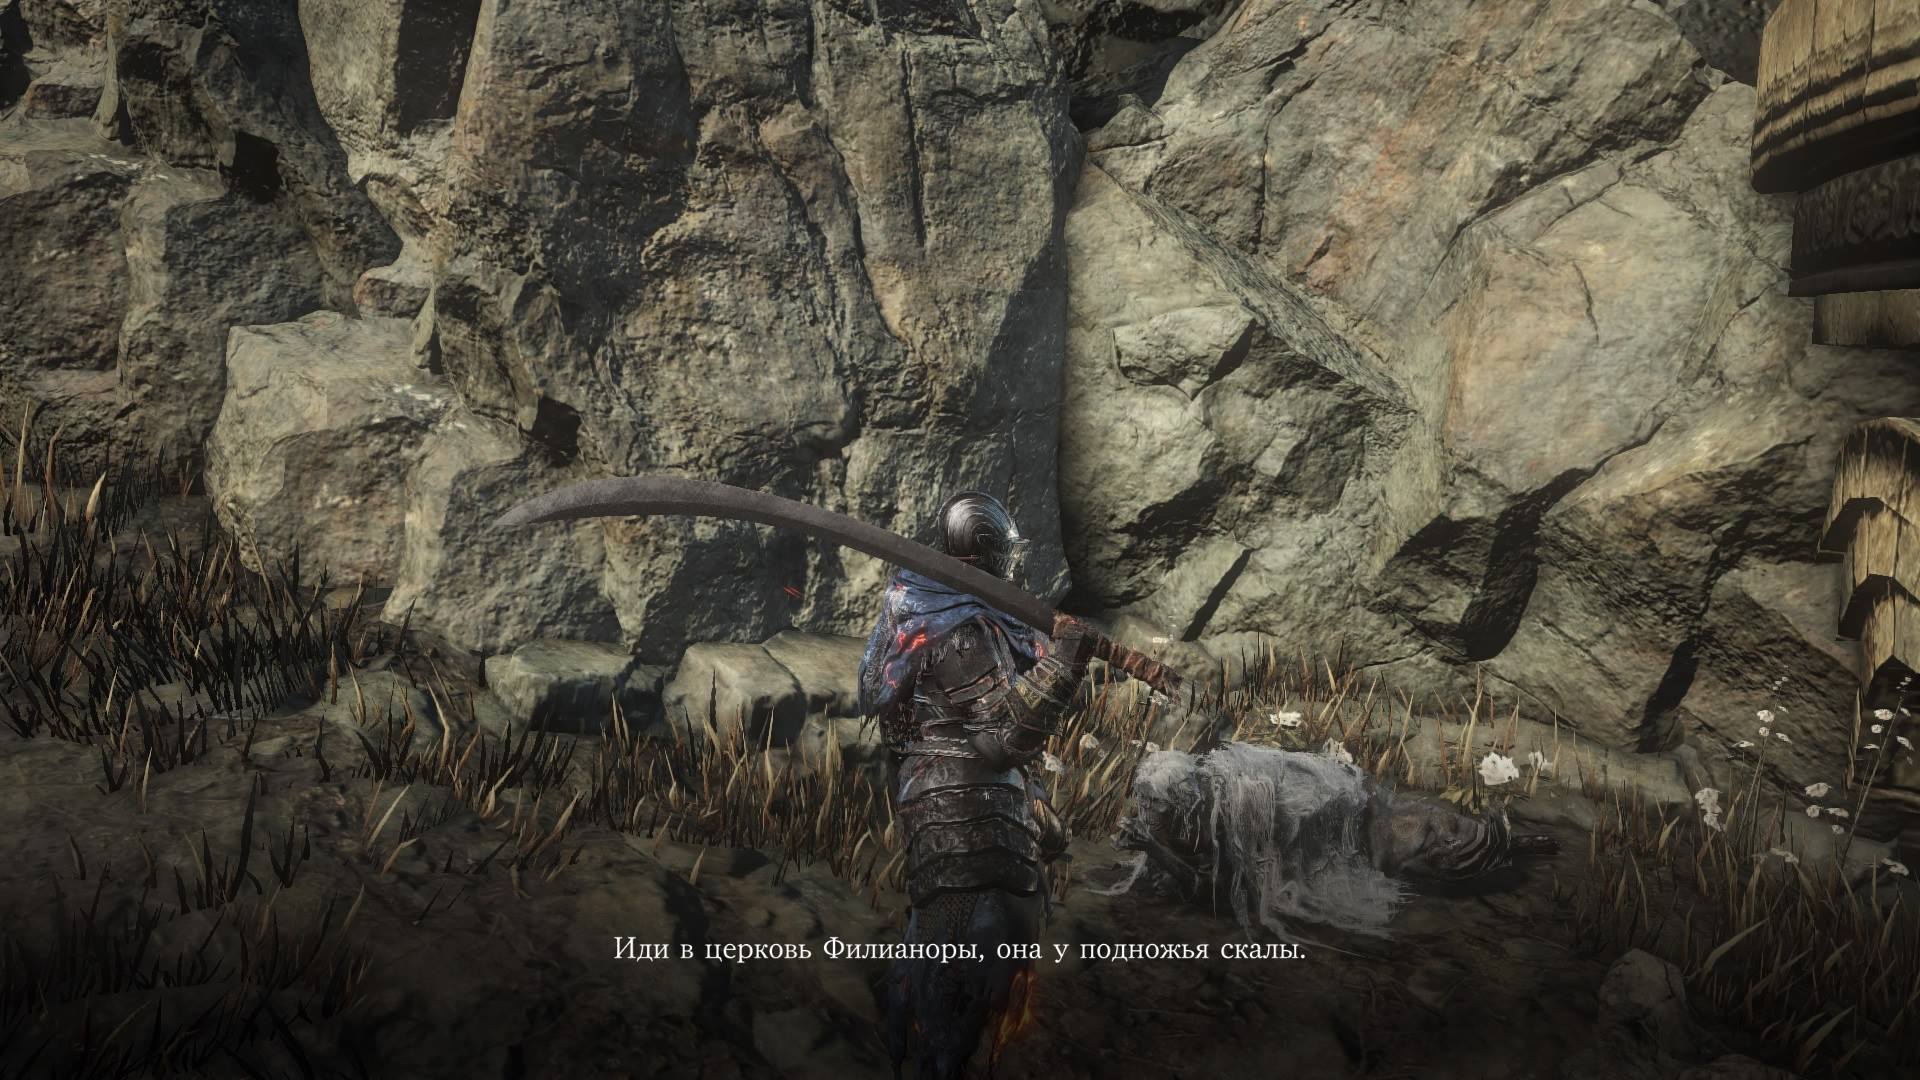
After a short fight, you can talk to an NPC named Shira. The character will stand outside the doors of the house, which in turn is at the top of the climb. And if you tell her the name of a god (the answer is "Gwynne") and talk to "calm" the dragon named Midir, then as a reward you will receive an item called "Sacred Shime of Filianore".
... Path: NPC Invasions and More Knights
It's time to go back to the bridge, near which your hero / heroine was ambushed by the vile pygmies. Cross the bridge, pick up two Mossfruit near the tree and go through the arch a little further. As a result, the character will find himself in a courtyard strewn with purple flowers, where the character will stumble upon another knight from the city beyond the wall (in this case, it will be a swordsman). After killing him, go up the stairs on the left side.

But attention now, because at this moment you will be invaded by the ghost of the Seeker of the Sperned. So, he is similar to Alva, who could be found at the entrance to a location called Irithyll Dungeon. In addition, it has a crossbow and murakumo. I recommend attacking the ghost only at the moment when he is either using a ranged weapon, or his combination of blows is coming to an end.
By the way, as a reward for the fight with the Seeker of Outcasts (of course, in case of victory) you will receive a "Wolf Ring", which will improve the balance of your character. But in a small alley on the far side of this part of the location it will be possible to find on top of everything else the Black Witch Set.

However, don't stray too far from the path you originally set, so head back to the stairs and continue down until you see a small depression on the left side. The bottom line is that a pygmy-cleric-tortoise and a pygmy-curser are hiding in this recess for the next ambush. But after dealing with them, continue to move on. A little further (to the left) there will be another ambush with the active participation of local residents. So get ready to attack, and after defeating them, pick up the "Moss Berries" and "Large Soul of a Crestfallen Knight".
! When you approach the swamp, three of Harald's legionnaires will instantly rise from the mud. However, if you have no desire to fight them, then you can calmly run past them or return to the place of the last ambush, and then turn to the right side - straight to the part of the location that is not necessary for passing.
Now, in the corridor where the hero / heroine falls, there will be (and one of them even hang) several pygmies of two types at once. So after killing them, go out to a spacious area covered with white flowers, which, in turn, will be patrolled by another knight, but this time a spearman. After that, in the same area, local residents (of all stripes) will arrange another ambush. Plus, they may even try to intervene in a duel with the knight, so try to be on your guard.
In theory, fighting these pygmies is not necessary at all. You can even just pick up the “Ringed Knight Spear” nearby and immediately after that run away on your more important business. But if you set yourself as a goal the destruction of all living things at the level, then I recommend first of all to get rid of the pygmies, but after them take up the knight.
In any case, it doesn't matter whether you killed them or just ran, you still need to cross the bridge nearby to meet the next enemy. Although not so strong, but for that rather familiar, albeit in the person of a locust preacher. Then go down to the large swamp along the rather conveniently located ledges on the right (the screenshot above will help you understand what this place is). In addition, if even the flask with Estus or your strength is already running out, do not panic: very soon you will stumble upon the next bonfire.
Do not miss the next "Titanite Chunk", which will lie near the flooded tower, and in addition to everything, you will need to deal with the clerics-turtles. But now pay attention, because one of these pygmies has acquired a new skill - a "turntable". After killing, be sure to pick up the "Soul of a Crestfallen Knight" and climb up the vertical ladder a little further. At the top, turn to the left, and if there is a desire, then talk to a rather friendly locust, otherwise go up further and do not slow down. At the very top of the character, a fork awaits.

Look to the left and you will see a crystal lizard (for killing this lizard you will receive "Shimmering Titanite"). There is a bridge behind the crystal lizard, and on the opposite side of your hero / heroine two knights from the city behind the wall will be waiting at once. The first will be the spearman. The second is the swordsman. I recommend that you lure one of them to yourself, and then deal with the second in the same way. As soon as you deal with two enemies, go around the buildings ahead and find another pygmy.
After killing this creature, go further along the balustrade to the next tower - inside you can find the Covetous Gold Serpent Ring. In addition, there will be Lapp inside, who is also engaged in seeking the Monolith of purification. But since you do not yet have information about the location of this place, go back to the fork.

This time, you will need to jump from the platform onto the serpentine, which will lead the character to a tall structure made of stone. And going inside, the hero will again become a victim of another invasion, but this time the “Silver Knight Ledo” will come to the main character, who will be armed with a huge hammer. Moreover, the same weapon will become yours as soon as its owner dies. It will be extremely slow to beat Ledo, but if he hits, then it will definitely not seem enough. Moreover, his special attack with flying stones is especially dangerous, which not only stick to the hammer, but also scatter when in contact with the ground or the player.

As soon as you deal with the next uninvited guest, then pick up the "Scraps of Titanite" (there will be two in total), and they will lie on one of the balconies. After that, go back to the entrance to the tower and go down the ledges to the ground, while on the way, be sure to take the Hevel's Ring with you.
It's time to go back to the swamp entrance and now turn to the right. At the farthest end of the narrow passage you will find the White Preacher Head. Once in open space, pick up the "Dark Gem" near the locust - these are small representatives of their race, so they will attack if you are attacked by older individuals. In any case, after that you will need to turn to the right. Go a little further to finally meet the first hostile representative of the race of humanoid insects.

The first thing you need to know about these individuals is that they use magic spears. Their back is also protected, because there is a strange but effective defense mechanism there. However, the locusts will not pose any great danger, because having a normal reserve of endurance and a fairly high-speed weapon, these enemies can be killed without much difficulty.
And after killing the locusts, just move forward, climb the stairs higher and pick up the "Prism Stone", and there will be four stones in total - they will all hang on the fence of the stairs. Turn further to the left and now you will find the long-awaited bonfire.
Location: "The Streets of the City Behind the Wall" (All Secrets)
♦ : Complete walkthrough of the location "Streets of the city behind the wall" in the latest addition "The Ringed City" for the original game Dark Souls 3. The location of all secrets, collectibles, all enemies in the location, useful tips and tactics for passing.
This guide is intended to help you find all the useful items, cope with the most powerful and problematic enemies, and just not drown in the quagmire of disasters that the player encounters in this location.
... "The dangers of swamps and the prevalence of locusts"
In addition to other important tasks, it will be necessary, in addition to everything, to open the locked doors in a room with a fire called "The streets of the city behind the wall." In theory, this can be done in just a couple of minutes, but in order to collect all the treasures in this location and other equally valuable things, you will have to study and examine everything as it should be.
The main enemies in this location will be two types of locusts: small and large. Adults, as a rule, will wait for the player, sitting up to their heads in mud (the screenshot below perfectly demonstrates the position of one of these enemies). Therefore, I recommend that you be careful first of all and do not constantly run headlong after the next luminous object. Of course, the "children" will not pose any danger, since they will attack only when the character is attacked by their "parents" (larger individuals). After all, these "maggots" don't have a lot of health.

When you get to the middle of the swamp, move along the left edge of the location until you come across a locust guarding a piece of Twinkling Titanite. And on the right hand of your hero there will be another Giant Judge (the first one could be found in a location called the Mausoleum Lookout), but now I do not recommend bothering him (and he himself will not be able to notice at such a distance your character), because there are too many enemies around now who will join the battle with great joy and crush the character not only by number, but also by force.
A little further on the left side of the same swamp there will be a half-flooded tower, to the roof of which a fallen column leads. Therefore, you can easily climb to the top of the structure. Above, kill the cleric-pygmy (tortoise-shaped creature) and then after the battle climb the hill on the left side. And on the way, deal with another representative of the local insect race.

On the hill sits a trinity of enemies, which consists of tortoise-shaped clerics. After killing these enemies, you will be able to collect the Titanite Chunk and the weapon called the White Birch Bow. In addition, the hill is useful in that a large group of hostile locusts will be visible from it - they can either be lured to this hill one by one, or simply left alone and move on, because they have no special values.
Now you need to go down to the swamp from the opposite slope from the "entrance" to the hill. Along the way, you also need to deal with another pygmy turtle, but this time from the enemy will drop "Young White Branches" in the amount of three pieces. If nothing falls from the enemies, then the branches lie near the tree. What are young white branches for? During the passage, they will come in handy for solving one very interesting puzzle.
Inside the building (near which the praying tortoise-shaped clerics are still gathered) lie the Church Guardian Shiv. But pick up this item only when you kill all these hunchbacks, otherwise you risk falling into their disfavor.
... Iron Dragonslayer and the Giant Judge

When you finally leave the building, move to the left until you reach a spacious area that resembles an "arena". This semblance of an "arena" will in turn be littered with the corpses of Harald's legionnaires. At this point, your hero / heroine will be waiting for the "Iron Dragonslayer" - this is an exact copy of the "Dragonslayer Armor" Boss straight from Lothric Castle.
So, in a battle with this enemy, try to deliver your blows clearly and synchronously on the side where the mini-Boss does not have a shield (the problem is that it is practically impenetrable) and at the same time try not to get carried away, not to be "greedy" - in general, do not stand in one place for a long time. If you, in turn, are not sure that you can regularly dodge his attacks, then use a shield with acceptable stability and protection from thunder damage. One of the most suitable shields in this fight is the "Giant Shield-Door", which can be found in this playthrough, but slightly higher.
In addition, like the main version, the Iron Dragonslayer cannot be parried, but for that he can be critically hit after being stunned. Finally, I will add that this mini-Boss will be extremely vulnerable to cold.
As soon as the Iron Dragon Slayer is defeated, you will not only receive a set of his armor, but also the opportunity to carefully study the area for values, and in this place you will find: "Titanite Scale" in the amount of two pieces and two "Chunks of titanite ”(And one of them will lie a little further on the way to the half-flooded church).

In general, if earlier the Judge could summon warriors and archers to his aid, now he, plus everything, can also summon sorceresses, who, in turn, use a rather unpleasant spell. It is worth dodging this spell only at the very last moment, because otherwise the blast wave will still reach the hero. In addition, try to get to this giant as close and fast as possible. The bottom line is that if the character is near the giant at arm's length, then he will no longer call on anyone, but will try to kill the hero on his own.

Hidden Blessing and Titanite Fragment are the rewards for killing this giant. But this is not all, because it is also necessary to inspect the rest of the previously inaccessible territory. This will allow you to find a Titanite Chunk, two standard Soul of a Weary Warrior, one Large Soul of a Weary Warrior, and Preacher's Right Arm). And while doing this, try to be careful, because some items in the area will be protected by locusts.
Now you can move on. Climb the hill nearby to reach, thus, to the roof of a small chapel - in this place pick up a new item called "Ringed Knight Straight Sword" + be sure to kill another insect-like preacher. From the same place it will be possible to jump down to the stairs that lead to the next bonfire called “The streets of the city behind the wall”.
... "Solving the Riddle and Workaround"
After you clear the main part of the swamp of enemies, it's time to move towards the flooded church. However, be careful: this place will be guarded by knights from the city behind the wall. In addition, if you are not looking for a way to quickly die, then I do not recommend fighting them (there is a whole group of knights). Try to lure enemies to you one at a time, and then kill without risking provoking the rest of the enemies (plus everything, if the Giant Judge or the Iron Dragon Slayer is alive, then it is best not to attract attention at all).

And yet, when you deal with the knights who patrol the church, be sure to pick up an item called "Black Witch Veil" (Black Witch Veil). This wonderful little thing lies near the left side of the building. Then go up to the lid - there will be a piece of "Shimmering Titanite". From the same place, you can see the bridge, which can be seen to be guarded by an impressive-looking dragon (by the way, it was Shira who spoke about it at one time), but in addition to the dragon, in the same place you can see a glowing doorway in a rather massive stone building. In general, go to this particular place to unlock the previously locked doors in the room where the fire is also located.
And now attention, because on one of the walls there will be an inscription with the words: "Show your humanity." In general, in short, this is a mystery. You can solve the puzzle using one of the young white branches that you, following this walkthrough, could get earlier. Go back down to the big swamp (and it's better to go down through the doors near the fire). There, use the young white branches - this item will help to blend in with the environment, turning the hero into what is presented in the screenshot above. So, without leaving this image, return to the engraving and climb the fallen stairs at the top.
After that, you will find yourself on a platform dotted with white flowers, which in turn will be patrolled by two knights from the city beyond the wall. But behind a rather high tower in the middle of this part of the location, another Giant Judge sits, but it's better not to provoke him ahead of time. So, first of all, without approaching the structure, you need to attract the attention of one of the guards (and best of all the swordsman) and try to deal with him as quickly as possible, otherwise the knight-spearman will also join this battle, which will significantly complicate the battle.

As soon as you manage to deal with the two knights, you can safely run to the giant, while trying not to catch yourself by surprise with phantoms, which, as usual, will be called by the Judge. For defeating this enemy, you can receive Divine Blessing and a few more Titanite Scraps.
But in fact, it is not even necessary to kill enemies in this place, because you can just rush quickly past them. In any case, whether you killed everyone or not - it doesn't matter, go down the stairs at the far side of the site and turn further to the left, towards a small bridge. By the way, along the way in the same direction you can find the Large Soul of a Crestfallen Knight. At the end you will find the "Monolith of Purification", in search of which Lapp came here. So, the monument can be used in order to forgive sins, reverse devastation and revive a certain hero (although this option will be unavailable for now).

Since the monolith was found, so it will be possible to return back to the knight who has lost his memory. Go back to the stairs you went down to this place to climb back and continue to move forward. On the way, kill the aggressive pygmy that will guard the Dragonhead Shield and then jump down. As a result, your hero will find himself right in front of the very chapel where the knight named Lapp will sit. Approach him, talk, point to the location of the monolith and return back to the fire.
... Dragon Bridge and Common Grave
After leaving the room with the inscription regarding the puzzle, turn towards the mountain path on the right side and pick up the "Titanium Scales" along the way. At the place where the scales were found, turn around and notice the approaching knight. Moreover, on the edge of the abyss, I recommend not to fight with him, although with a successful combination of circumstances (for example, with a stab in the back), he can quite beautifully fly off into the abyss. Therefore, in any case, when you deal with the knight, be sure to pick up the "Dragonhead Greatshield". As soon as pick up the item, climb the bridge.
And in his usual manner, the bridge will be guarded by a large and evil dragon who does not hesitate to use his fresh fiery breath. Your main task is to reach the first object glowing in the farthest part (see the screenshot above), and then enter the crevice nearby. The only problem further is that another aggressive pygmy set up an ambush: he will try with all his might to push the character directly into the flame of a fire-breathing dragon. Therefore, try to calm down the aggressive upstart in advance and pick up necessarily "Titanium scales" (two pieces) inside a small cave and one "Soul of a tired fighter" at the exit from this cave.

Before rushing towards the luminous object, wait for the moment when the dragon sweeps over your character one more time. Although the object will turn out to be garbage, something else is important, for example, that even though the earth has not cleared of fire anyway, it is still possible to move along it due to the rifts, therefore the damage to health will be small. But don't hesitate, jump to the safe area (which is marked in the screenshot above) and grab the Titanium Scales. There will be a pygmy ahead of the hero, so kill him in order to calmly reach the entrance to the next area. There will only be a Big Soul of a Tired Combatant behind, but it will be much easier to pick it up now than usual.
This article provides a brief Dark Souls 3 Walkthrough... After reading it, you can find out what dangers await you, which places you have to visit, and which ones to fight. So let's get started.
After creating a character, you will be taken to Ash Cemetery... In Dark Souls 3, the passage of this location should not cause you any difficulty, as this is a kind of training. Just read the clue signs and gradually move towards the exit. At the end of the Graveyard, a boss battle awaits you.
Having won, you will be taken to the surroundings, and then to the building itself. This place will become your base, since here you can buy and improve equipment, get hold of some useful items, and just chat with different NPCs.

After running around the territory of the temple, go with the help of the central fire to. This location can be roughly divided in two.
- Passage 1 part: turn right from the fire and go through the crack in the wall. Move deeper into this branch, systematically exterminating enemies, and in the end you will find a longbow and several other useful items.
- Passage 2 part: return to the fire and move in the opposite direction. Here you will meet new opponents along the way, among whom there will be a mimic and even a fire-breathing dragon, but, with proper skill, you will reach the end of the location without any problems. But the most dangerous enemy awaits you at the end of the location - this is the boss.
After defeating the boss, place the previously obtained flag on the edge of the cliff. So you will use the services of local airlines and arrive at the Settlement of the Undead. Your path is straight. Exterminating enemies, you stumble upon a pilgrim named Yoel from Londor, and after a heart-to-heart conversation, he agrees to go to live in the Temple of Fire.
Next, go to the gate and open it by pulling the lever. Everything is as usual here: you kill the undead and slowly but surely go to the end of the location. Along the way, by the way, you can join one of them, but this is already a topic for a separate article. Now we are only interested in the passage in Russian Dark Souls 3, so do not be distracted by such trifles and follow straight to the boss - the Cursed Great Tree.
The next location on your way is this. It is interesting in that here you can find as many as three useful NPCs, each of which will tell its own story. For the rest, just chop the monsters to pieces until you reach the boss - the Connoisseur of crystal spells.

A little further than the place of the battle with the boss is the entrance to. She will be the next location in your adventures. The terrain here is swampy, and even replete with poisonous opponents, so things with resistance to poison will come in handy.
It is best to go through the Citadel in a circle, and your main task here will be to find three altars, which will open the way for you to the boss.
So, after passing a few more dangers, you are in. Here it is important not to forget to go to the left of the main gate and pick up coal. Inside, watch out for the spider living on the ceiling, otherwise it will catch you by surprise. The main villain of the location is the one you have to kill for the further passage of Dark Souls 3.
Next, you have to visit. Your main task here will be to find the keys and unlock the lattices with them. Keep in mind that most doors can be opened with the jailer's keys, which are at the entrance to the next location, so a good option would be to walk there and then go back. By the way, there is no boss in the Irithyll Dungeons.
Your path leads through a passage that leads directly from the room with the Dancer. This will take you to. Jumping on the rooftops, crossing the bridge, and then riding the elevators, you will get to the boss, and after destroying him you will go to the Great Archive.
In the archives, immediately try to kill the magician, otherwise he will bother you. Also, stock up on pills from the curse, otherwise you risk getting stuck in this location for a long time. Ultimately, a boss battle awaits you. Lothric.
Now you just have to return to the Fire Temple and activate all the relics on the thrones, and then talk to the Keeper. So you get to Furnace of the First Flame and you will be able to fight with the final boss of the game -.

After defeating the boss, go to the fire. One of several endings awaits you. At this, the passage of the game Dark Souls 3 can be considered complete, but you can still fight with several optional bosses or start NG +.
With igward from KatarinaYou will meet with this character throughout most of the game. The hero is dressed in heavy armor of the Knights of Katarina, which you can get later.
I. For the first time, you will meet Siegward in the Settlement of the Undead, in a tower at the top of which is a giant with a bow (you have already experienced the charm of his arrows before).
Below is a strong icy rival, from which the Sword of Irithyll falls. Sigward himself will go down to you by elevator as soon as you enter the tower.
Talk to him several times (after talking with any character, do not forget to interact with him repeatedly until he starts repeating the same line) and stand on the lifting platform.
There are two elevators, but now you need the one that goes up. As the platform goes up, you will notice that there is an additional floor in the middle of the path. Calculate the moment and jump there, then go outside.

Sigward from Katarina will be waiting for you sitting on the edge - talk to him. Now go down to the courtyard to the fiery demon and get ready for battle. Sigward will join you, so wait until he hits the enemy a few times so that he switches to our friend.
For the victory, Sigward will give you Sigbrau - an item that can be exchanged at Pickle-P for the Sun Warrior armor. Talk to him a few more times to get two new gestures.
II. The second time, you will meet Siegward at the Temple of the Deep. After the Path of Sacrifices, do not go to the Catacomb location if you want to completely complete the Siegward chain, but go to the Temple.

In front of the entrance to the chapel, on the left, there is a well. It turns out that Sigward is sitting inside, whom Patchwork threw there, having previously stolen his armor.
There are two options for returning them:
1) Buy the key to the tower in the Temple of Fire for 20,000 souls and go into it. You will be trapped - Patchwork will slam the door behind you. Get out and find the rogue in the Temple. Here you can buy Siegward's armor from him.

2) While in the Temple of the Deep, lift all the bridges on the lower level, where there are two giants. Head upstairs and find Siegward standing at the entrance on one of these bridges (in fact, it will be a disguised Patchwork).
Go to the bridge, and then Patchwork will lower it. To find him and take revenge, follow the same path to the vaults of the chapel (for a complete description, see the guide "", "").
Finally, kill the offender and take the armor. If you put them on now, the chain will end. To continue it, return to the well and give the armor to Sigward.

III. For the third time, Sigward will be waiting for you in the kitchen of the Anor Lodno location. The way there is through a sewer full of arachnid women. Here you must meet Siegward before killing the Giant Jorm. Talk to him.

IV. In the location of the Irithyll Dungeon, you will find Siegward from Katarina in a cage; At the lowest levels, where the standing giant sleeps, and many rats are running underneath. Talk to Siegward through the bars.
To save him, you will need a key, which is located in one of the chests, which is in the sewer not far from the giant.
The very path to Siegward's prison lies through another a location called the Defiled Capital. There are two paths from her: one to Jorm and the other to a church with toxic waters. After passing along the wooden extension, jump into the water and run to the vertical stairs.

Climb up, then step left, to the usual stairs. Be careful here and don't miss the tiled roof, where you can easily jump. On it you will find a named enemy magician. Kill him and, with a running start, jump into the window. The direct path will lead you to Siegward's cage.

Now, if you haven't killed Aldrick yet, Sigward of Katarina will join you in the battle against Giant Yorm, after which his chain ends. Knight Katarina's armor will lie at the throne if you did everything right.
And nri from Astora
This NPC is an essential character in the storyline of Dark Souls 3, which can nevertheless be easily overlooked. Paul Henri changes in a mirror image of yours, but apart from the appeal it does not make any significant difference.
The fate of this hero can affect the ending of the game, and the Usurpation of Fire (4th version of the ending) cannot be carried out without him.
To Usurp Fire, first find Yoel of Londor, who can be found near the first bonfire of the Undead Settlement location. He will be among the bodies of his fellow pilgrims - talk to him, and then go to the Fire Temple.

Yoel will already be waiting for you, and not empty-handed. The pilgrim will offer you to increase the level - do it five times (you will have five dark marks in your inventory).
Before each promotion, you must die at least 2 times, keep in mind. After that, Yoel will die, and the no less mysterious Yuri from Londor will appear next to his corpse. After talking with her, go to the location of the Path of Sacrifices.

Once there for the first time, you will meet two knights: Henri and Horace. Talk to her / him here and continue your journey.

The next time (after killing the Deacons of the Deep) Anri will be waiting for you in the Fire Temple, where he will tell you that he is heading to the Catacombs of Karthus. Already there you will find Henri twice and once Horace. For the first time, Anri will stand in one of the corridors, next to which a wheel of bones rolls.

The second is at the long wooden bridge behind the stalagmites.

You will find Horace nearby, having gone down the same bridge (you must first break it). Having dealt with the crossbow and the driller snake from below, find a small passage where Horace is. Kill him and return to Anri.

She / he need not be informed about what has been accomplished, next time you will meet in Irithyll of the Cold Valley before the battle with Pontiff Sullivan at the fire in the Yorshki church.

Return to the Fire Temple and get a line from Yuri stating that your spouse is ready for the ritual. Go to Anor Londo and use the revolving bridge tower to enter the tomb.

Inside, you will meet a pilgrim who will hand you a ritual sword. Go ahead and watch the splash screen - Anri's quest ends here.
But Horace need not be killed, which is where other plot twists and turns come from:
1) In this case, neither Yoel nor Yuri is important for the advancement of the line, so it is not necessary to "suck the power".
After talking with Anri by the fire in the Yorshki Church, do not return to the Fire Temple, but go to the statues that stand there in one of the corners. Stand in front of them and use the Wave gesture, after which Londor's spy will emerge from behind the statues.

Killing him will force Yuri to leave you forever, respectively, no one will kidnap Anri and the ritual in the tomb will not take place. In Anor Londo, go to Boss Aldrick. In front of him, use the call mark (Anri's sign is a stone) to help Anri kill him in her world (you will be a phantom). Returning to the Temple, take the sword of Anri from Ludlet of Courland.

2) If you leave Horace alive, but do not tell Anri about it, then after the end of the previous option, visit the Smoldering Lake again (the location to which you go down the bridge in the catacombs) and look into the same place where you had to fight with him ... On the spot you will find the grave of Anri and the living Horace, who will immediately attack you.
3) After killing Horace and telling Anri about this, at the place of the battle with Horace you will find his grave and the living Anri, who will pounce on you.
1, 2 and 3 options close the 4th ending of the Usurpation of Fire, but, one way or another, complete Anri's storyline.
With irris of the Sunless Lands
This is one of the active heroes of Dark Souls, whom you can help in difficult times. As with other quests, this chain can easily be overlooked.
The first time a character will visit the Fire Temple is after your conversation with Anri in the Path of Sacrifices location. The next one - after the issuance of the Ashes of the Dreamer to the servant of the Temple, which can be found behind a hidden wall, which is next to the Watchdogs of Farron covenant. In the future, Sirris can be summoned by you in battles with the Guardians of the Abyss, Princes, Armor of the Dragon Slayer and Deacons of the Deep.

To advance her chain, it is necessary to strictly follow this list:
I. You cannot join the Fingers of the Rosary covenant, otherwise Sirris will become your enemy and will attack you at the first meeting.
II. After returning the Dreamer's Ashes to the handmaid, talk to Sirris to receive a new gesture - Allegiance to the Dark Moon, with which you can join the Covenant of the Blades of the Dark Moon.
III. At the bridge that leads to Irithyll of the Boreal Valley, slay the Salivan Beast and return to the campfire. Re-enter the game or teleport to the Fire Temple several times so that the Sirris summon sign appears at the end of this bridge. Agree to help her and defeat the red phantom Creighton the Drifter. As a token of gratitude, she will present you (in the Temple) with the Consecrated Panzerbreacher and the Ring of the Silver Cat.

To completely defeat Creighton, you must kill him in your world. He will invade you at the Irithyll cemetery, near the Church of Yorshka. After that, you can get his armor on the same bridge where you fought the Salivan Beast.
IV. After defeating Aldrick, return to the site of the battle with the Cursed Great Tree. Activate her sign and together kill the Righteous Knight Godric. After that Sirris will swear to you in eternal service in the Temple of Fire. Take the Shield of Dusk from Godric's grave, which is located between the Temple and Judge Gundir, at the cliff edge. In the end, Sirris will help you in the battle with Lothric and Lorian.

Yuri from Londor
The key character of Dark Souls III, on which the receipt of the fourth ending depends. However, as with Anri of Astora's questline, Yuria's quests can also be completed differently.
In order for Yuri to come to the Temple of Fire at all, Yoel from Londor - the pilgrim, whom you found near the first bonfire of the Location of the Undead Settlement, must die.
It is necessary to take from Yoel five black marks, that is, to raise the level five times. It is important that these marks cannot be removed; The Stone of Purification should not be used either; you need to get the fifth mark before visiting the Catacombs of Kartus.

The heroine will leave you if you get rid of the Black Marks, or if Anri of Astora dies (which is necessary for the 4th final), or if you kill the mercenary in the Yorshka church, which is hiding behind the statues.
If you correctly complete her instructions, then you can summon the Pale Shadow of Londor to fight the final boss. By the way, after the completion of the storyline, Yuri will leave and leave you the sword of the Dark Current. It can be obtained earlier if you kill her, but then the chain will break.

But besides this, Yuria has another quest, when she sends you to kill Orbek, as he can disrupt her plans. The target itself is located in the poisonous swamps, in the same place where the battle with the Crystal Enchantment boss is going on.
After passing the stairs and the bridge, turn left to the hole in the wall. Go a little further until you find piles of books - Orbek will be among them.

If you kill him and bring Yuri's ashes, you will receive a Quartz Blade as a reward, whose attack grows in proportion to your health.
And rina from Karim
A blinded woman who can replace the existing Keeper of the Fire. She can also translate the Sacred Tomes of Magic of Miracles, which is greatly needed by those who play through magic.
I. The path to Irina is located in the Settlement of the Undead. For your starting point, take Aegon, the hammer-wielding man in front of the church where you first meet Siegward of Catarina.
There are two ways to get to Irina:
1. There is a small crevice just behind Aegon. With activated charcoal and a medium bar of health, you can gently jump there, spending, however, up to 90% of your health.

2. A less painful way is through the door in the sewer with several small and one large rats. From the third campfire of the Settlement, find the bridge (it is located immediately to the right of the bonfire), but initially the door there will be closed.

First of all, look for a short path that is to the right of another, but smaller bridge that leads to Siegward and Aegon (it is guarded by two hollow ones with saws and vats).
At the door near the bridge, kill the dog and go into the sewer. In the middle of the path you will find the necessary door leading to Irina, at the end of the path - the door that was initially closed (to the right of the third fire).

However, before you go in search, for this option you will also have to grab the Grave Key, having bought it from the maid in the temple. In one of the tunnels you will find Irina sitting. It's up to you to decide which option is easier.
II. If you agree to accept Irina, she will move to the Fire Temple. After killing her, then you will have to fight with her protector Aegon, respectively, the girl herself will no longer be resurrected. It is interesting that the development of Irina's fate depends on the folios that you will give her (light or dark).

In order for Irina of Karim to become the Keeper of Fire, you must hand her extremely light tomes. As a Keeper, she will move to the nearest tower (the one that opens with a key for 20k souls), and it is there that she will increase your level.
After you kill the Dragon Slayer Armor boss (and if Irina has already settled in the tower), Aegon will kill himself. From his body you can pick up Morn's ammunition.

Dark tomes will gradually drive Irina crazy. By purchasing at least one dark spell, you will make Aegon your enemy, and he will leave with the girl. You can meet them again in the arena where the battle with Judge Gundir took place.
Kill Aegon and talk to Irina twice. She will agree to return to the Temple, after which she will ask you to touch her. But before that, put on the Morn's Bracers obtained from Aegon. Your touch will kill Irina, and her ashes will reveal new items for you from the maid.
Video: how to start all quests from NPCs in Dark Souls 3
Like, if useful
Original author: Dmitry Rud
Dark Souls 3 in terms of game mechanics has not gone too far from the previous parts, but a user unfamiliar with the series may have a lot of questions when he first visits Lothric. This guide will introduce you to the main aspects of Dark Souls 3, tell you what to do at the beginning and what is best not to do at all, and, in addition, will give advice on pumping characters of different classes.
Duration Dark Souls 3
The less familiar you are with the past parts of Dark Souls, the more time you can potentially spend on the first playthrough of Dark Souls 3. The average franchise newbie will be able to master the triquel in 30-40 hours, while the "veteran" of the series will need no more than 20-25.
As for the add-ons, Ashes of Ariandel came out relatively small, at 3-4 hours of game time. At the same time, The Ringed City will take at least twice as long - at least 8 hours.
What character level do you need for add-ons
The developers advise to approach Ashes of Ariandel with a character of at least level 60, and for The Ringed City they recommend pumping the hero to at least 100. However, due to the weakness of the protagonist, no one can block the entrance to the add-ons, so the time of the first acquaintance with the dangers of local DLCs is determined by you.
Where to go after ...
If you defeated the boss of a location and nothing happened, then most likely you are at a dead end. The map of Dark Souls 3 zones that we have created, which can be seen below, is called to help with orientation on the terrain. It marks all the required and optional territories, as well as the location of the Ashlords, who must be killed to gain access to the final boss.
What to pump first
Before pumping your character, you first need to decide on his class. There are 10 of them in the game, and they affect, in fact, only the very start of your journey, since closer to the middle of the passage you can "mold" a hero of any type.
The choice of characteristics for improvement depends on two factors: the starting class and your weapon. What attributes are required for a conventional sword or spell, these are the first to be pumped.
If the enemies kill the hero with one blow, it will not be superfluous to increase the vitality, and for constant swinging with a heavy sword it will take a lot of stamina. Physical strength will come in handy so that the protagonist can wear heavy armor without unnecessary penalties to movement speed and rolls.
What to choose as a funeral gift
Unlike the first part of Dark Souls, where there was an obvious favorite (master key) among the starting gifts, in Dark Souls 3 such a useful item is not given. However, the most effective in the short term are black fire bombs (will help with the second phase of the fight against Judge Gundir) and a fire gem (useful in the Temple of the Deep).
The rest of the gifts are either too narrowly focused (like a young white branch), or lose their meaning after the first few hours of play (like the ring of life and both blessings).
How to reallocate stats
To be able to redistribute all the stat points earned from the very beginning of the game, you must join the Fingers of the Rosary covenant (the personal chambers of its leader are located on the upper tier of the Temple of the Deep).
Becoming a member of this order, exchange one pale tongue with the Rosary for the ability to be reborn. This will reset all accumulated attributes and redistribute them again. This function is available five times per play, and each time you have to pay. Accordingly, you need five languages.
What not to do in Dark Souls 3
Having made several unforgivable mistakes at the start of your playthrough, you can cut off the hero from potentially powerful weapons, useful merchants, or simply make your life much more difficult. The following tips will help you avoid these troubles:
- Do not absorb the souls of bosses - yes, they are quite valuable in terms of experience gained, but with their help you can also get hold of quite powerful weapons, spells and rings.
- Do not kill peaceful characters - the first (like Andre and the maidservant at the temple) after this will increase prices in the "shops", the second (Leonhard and Sirris) will leave you without their quest line, and the third (magic teachers) will simply leave ashes in their place with everything assortments of goods that they had.
- Do not overload your character - the armor will never be superfluous, however, it is of little use if the hero barely moves; try not to load the character by more than 70%.
- Do not use Ember too often - these items will be extremely small at first, and their use (if you are connected to the network) can lead to the invasion of an enemy phantom. If you want to increase your health - carry coal with you "in your pocket" and use it only as an emergency alternative to flasks with estus.
- Do not give Irina the dark tomes - it will be possible to learn the forbidden miracles from another teacher (Karla), and the forbidden volumes of miracles will drive the poor girl crazy.
- Do not send Greyrat to Irithyll without help - in order not to lose access to the services of a thief merchant, before Greyrat's sortie to Irithyll, make sure that Patchwerk or Siegward has an onion set of armor.
- Do not join the Fingers of the Rosary covenant before completing the Sirris quest, otherwise the Moon Warrior storyline will not work.
What to do with the souls of bosses
Until the massacre of the Cursed Great Tree, there is really nothing to do with the souls of bosses, except for their absorption. So be patient and save them until you get the transposition oven, issued for killing the tree. This item (after transferring it to Ludlet from Courland) will allow you to exchange the souls of bosses (sometimes with a surcharge) for various spells, rings and weapons.
How to upgrade weapons
Upgrading weapons in Dark Souls 3 can be carried out in two ways: increasing direct damage and giving the blade additional properties. Both require consumables.
To enhance the weapon you need titanite. It comes in two flavors - standard (shard, large shard, shard, and chunk) and special (shimmery titanite and titanite scales). The latter type is used to improve non-standard and unique weapons. For example, created from the souls of bosses.
The second upgrade method is called hardening and involves the use of impregnation coals and gems. The former are needed to gain access to various types of hardening itself, the latter for their implementation in the case of a specific weapon.
Finding Farron's Charcoal and Heavy Gem, for example, can increase your Greatsword's strength bonus. However, in the early stages it is not recommended to temper weapons due to the reduction in the main damage when using all gems.
What can be exchanged with the chick in the nest
As in previous games in the series, Dark Souls 3 has a less obvious vendor - a chick from a nest on the roof (under the roof) of the Fire Temple. To get there, you will have to get the key to the tower. You can buy it from the servant at the temple for 20 thousand souls or knock it out of Irina.
List of items for exchange and receipt:
- Thunder urn - iron helmet
- Sigbrow - Armor of the Sun
- The bone of return - iron bracelets
- Seed of the Giant's Tree - Iron Leggings
- Staff of the Beggar - Sun Shield
- Burning Bone Shard - Snout Shield
- Fire Bomb - Large Titanite Shard
- Black Fire Bomb - Titanite Chunk
- Twisted Sword Fragment - Titanite Chunk
- Large Leather Shield - Shimmering Titanite
- Blacksmith's Hammer - Titanite Scale
- Crossbow "Evelyn" - titanite scales (3 pieces)
- Iridescent Stone - Shimmering Titanite
- A beautiful skull - a sign "Hello"
- A hidden blessing - a sign "Thank you"
- Heavenly Blessing - Excellent Sign
- Loss Stone - Sign "Sorry"
- Bell (any) - sign "Help!"
- Jeremiah's Crown - Thunder Jewel
- Moaning Shield - Sanctified Gem
- Ax Eleanor - Wasted Gem
- Chains of Bone - Lucatiel's Mask
- Loretta's Bone - Ring of Sacrifice
How can you quickly accumulate souls
There are plenty of places for the so-called farming of souls in Dark Souls 3, but at first, the silver ring of the greedy serpent will help to significantly speed up the process of accumulating experience (by 10% increases the flow of souls), which is located behind the illusory wall in the room under the roof of the Temple of Fire.
Among the easiest ways to earn souls is to help other people. Defeated a Boss - Leave a Summon Sign near the arena for other players to see. For a cooperative triumph, you will receive not only a tidy sum of experience points, but also additional coal.
Three Husks are sitting near the "Ruins of the Citadel" bonfire (location "Fortress of Farron"). Equipped with the Silver Ring of the Greedy Serpent, you will receive 385 souls for killing each spearman. It takes from 10 to 20 seconds to kill all three, so for an hour of intense genocide of the Husks, you can earn several hundred thousand souls.
In the later stages of the game, the entire Lothric castle (barracks and archive) can be used as a (relatively) quick soul-gaining playground. Since the locations in this area are quite extensive, a lot of experience can be accumulated by the end of each passage. Alternatively, there are two Silver Knights next to the Anor Londo bonfire.
How the cooperative works
You cannot call anyone to help you in Dark Souls 3. The game uses a special algorithm that compares the level of your character with the hero of another user - "recruit" or "summoner". If the difference in levels is less than or equal to fifteen, then there will be a cooperative.
To call someone for help, you first need to "ignite", that is. use coal. But to help others, coals are no longer needed - it is enough just to leave a corresponding sign on the ground with the help of white chalk. Moreover, for a successful cooperative kill of a boss, your character will return to the "coal" state or receive additional coal.
Most often, summoning signs are placed near bonfires or right in front of the entrance to the arena. To balance the presence of three (and when using dried fingers and all four) friendly players in the same location, the health of all enemies, including the boss, will be significantly higher than usual.
Why are covenants needed
Covenants are predominantly multiplayer alliances that can significantly reward you for completing intra-clan missions. Different alliances have different goals, but the way to join them is the same - you need to find or get the appropriate emblem and equip it.
“Warriors of the Sun” and “Blue Guards” set themselves the goal of helping others, and, for example, “Fingers of the Rosary”, on the contrary, try to annoy the players. Some factions, such as Farron's Watchdogs and Loyal to Aldrick, simply try to keep outsiders out of their territories.
It is not necessary to join the covenant to complete Dark Souls 3, but these groupings will help you fill the multiplayer component with additional meaning and feel like a part of something bigger. And at the same time, and get hold of useful items.
Why do you need "New Game +"
New Game + is the opportunity to replay Dark Souls 3 with all the stats and equipment you earned. With each cycle up to the eighth ("New Game +7") enemies will become more tenacious and bring more souls. In addition, only with repeated playthroughs the reinforced versions of the rings required for the achievement "Master of the Rings" will become available.
With the start of a new game, this way, you will lose all key items, an additional assortment of goods for a maidservant at the temple, the ability to temper weapons at Andre, all workarounds and previously unlocked bonfires at locations. But the level of the Estus flask and its quantity will remain, and some corpses will begin to leave more valuable souls.